
How to Laser Engrave Tumblers with Thunder Laser
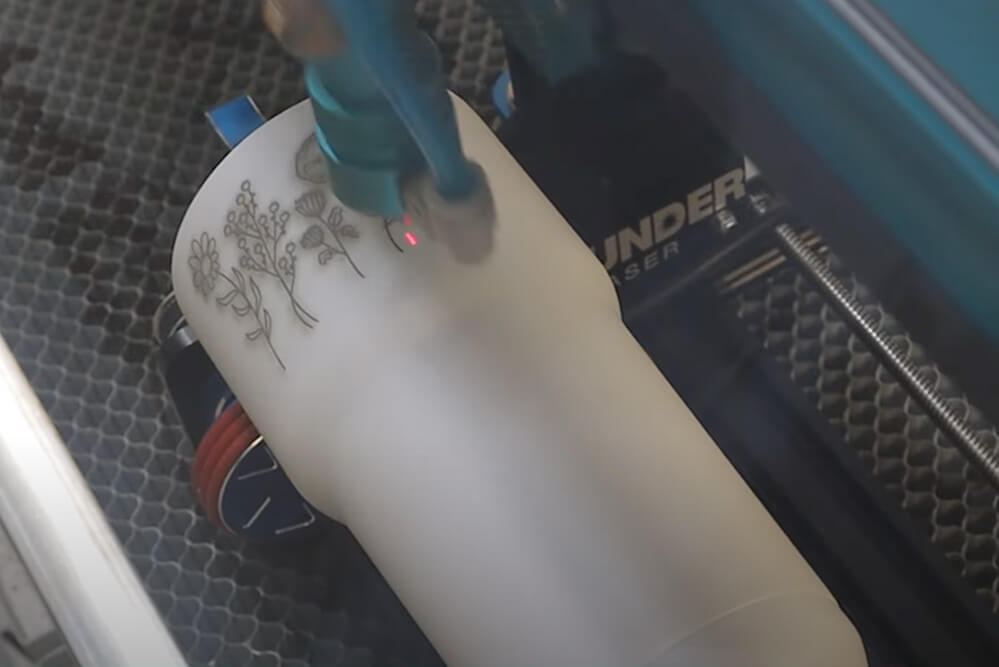
Are you looking to take your laser engraving to the next level? Check out our latest tutorial video, where one of our customers demonstrates how to use the Thunder Laser roller rotary to engrave tumblers!
With these easy-to-follow instructions, you’ll be able to engrave on cups, mugs, tumblers, and other similar items effortlessly and create stunning designs in minutes!
Step-by-Step Guide to Laser Engraving Tumblers
The video above walks you through the complete engraving process using a Thunder Laser and rotary attachment. Below, we’ve summarized the key steps, recommended equipment, and best practices to help you achieve clean, professional results on powder-coated tumblers.
What You’ll Need
Before you begin, make sure you have the following:
- Thunder Laser CO₂ laser engraver
- Rotary attachment
- LightBurn software
- Powder-coated stainless steel tumbler
- Clean microfiber cloth
- Measuring tape or calipers
A rotary attachment is essential because it rotates the tumbler while the laser engraves, ensuring the design stays aligned around the curved surface.
Prepare the Tumbler
Clean the tumbler thoroughly before engraving to remove dust, fingerprints, or oils that could affect the final result. Next, measure the tumbler’s diameter so you can correctly configure the rotary settings in LightBurn.
Secure the tumbler firmly in the rotary attachment. It should rotate smoothly without slipping or wobbling during engraving.
Set Up Your Design
Create or import your artwork into LightBurn. Popular choices include:
- Company logos
- Names and monograms
- Custom graphics
- Inspirational quotes
- Wedding or event designs
Make sure the artwork is properly sized and positioned for the tumbler’s printable area. Taking a few extra minutes to check alignment can help avoid wasted materials.
Test Your Settings First
Laser settings vary depending on the tumbler’s coating, laser power, lens, and machine configuration. For that reason, there is no single setting that works for every project.
Before engraving customer products, always run a small material test on a similar tumbler. Testing allows you to find the right balance of speed and power while preventing overburning or incomplete engraving.
Start the Engraving Process
Once everything is aligned and focused, start the engraving job and monitor the first few passes to ensure the tumbler rotates correctly. A properly configured Thunder Laser produces smooth, even engravings that reveal the stainless steel beneath the powder coating with excellent detail.
After engraving, wipe away any residue with a soft cloth to reveal the finished design.
Tips for Better Results
For consistent, professional-quality engravings:
- Clean the laser lens regularly.
- Keep the rotary attachment level.
- Double-check focus before every job.
- Use high-quality powder-coated tumblers.
- Test new tumbler brands before full production.
- Perform regular machine maintenance to maintain engraving quality.
Following these best practices will help reduce material waste and improve production consistency.
Why Choose a Thunder Laser for Tumbler Engraving?
Thunder Laser machines are designed for precision, reliability, and ease of use. When paired with a rotary attachment and LightBurn software, they make it simple to produce detailed engravings on tumblers, water bottles, mugs, and other cylindrical products.
Whether you’re creating personalized gifts, promotional products, or launching a custom laser engraving business, Thunder Laser provides the performance needed for consistent, high-quality results.
See what a Thunder Laser can do for you
U.S.-based support, financing, and a two-year warranty on every machine.
Book a demo →Keep reading
Can Rice Paper Be Laser Engraved?
Yes, rice paper can be laser engraved, but it requires very delicate handling. This thin, fragile material is known for
How to Make a Laser Engraving File
Creating a laser engraving file is the first step to turning your design into a physical product. Whether you are

How to Make Acrylic Cake Toppers with a Thunder Laser Nova 24
YouTuber Things Katie Makes demonstrates how to make acrylic cake toppers using a Thunder Laser Nova 24, Lightburn, and Adobe