
AccuMetal Chiller Guide
S&A (Teyu) CWFL-1500BN dual-circuit industrial chiller · ships with every AccuMetal 24 and 51 · Thunder Laser USA · Nov 9, 2026
What it does
The CWFL-1500 is two chillers in one cabinet. The low-temperature circuit cools the MAX fiber laser source. The high-temperature circuit cools the cutting head optics. Each has its own tank, pump and setpoint, because the source wants to run cooler than the lenses — if the lenses run below room dew point they fog, and a fogged lens burns.
It plugs into its own 240 V single-phase circuit, runs on R-410A refrigerant like a window air conditioner, and connects to the machine with two supply and two return hoses on Rp 1/2 in fittings. Fill and level gauge are on the back.
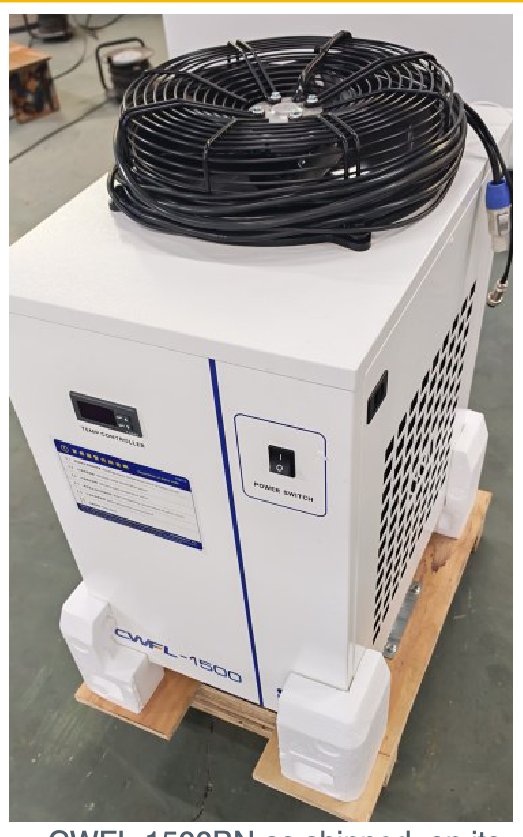
Specifications — CWFL-1500BN (60 Hz, North America)
| Item | Value |
|---|---|
| Power | AC single-phase 220–240 V, 60 Hz · 3.4–16 A · 3.6 kW max draw |
| Circuit | Dedicated 20 A, 240 V single-phase (separate from the machine's 9 kW feed) |
| Cooling capacity | 5.03 kW nominal (17,145 BTU/h); compressor 1.69 kW |
| Refrigerant | R-410A (or R-32 on newer builds) |
| Circuits | Two, independent: low-temp (laser source) and high-temp (optics) |
| Temperature control | 5–35 °C range, ±0.5 °C stability; constant or intelligent (ambient-tracking) mode |
| Pump | 0.48 kW · 4.3 bar max · ~30 L/min source circuit, ~2 L/min optics circuit |
| Tank | 22 L total |
| Water connections | Rp 1/2 in inlet and outlet, each circuit; stainless |
| Size | 70 × 47 × 89 cm (27.6 × 18.5 × 35 in) |
| Weight | 68 kg net (150 lb); 79 kg crated |
| Ambient | Keep the room under 45 °C (113 °F); well ventilated |
| Protections | High/low water temp, ambient temp, sensor fault, flow alarm — relayed to the machine controller |
| Warranty | 2 years (S&A) |
Specs from the S&A; manual (CWFL-800/1000/1500) and teyuchiller.com. The ANP/BNP revision adds a 0.55 + 1 kW heater option; confirm the exact revision on the nameplate.
Setpoints
| Circuit | Cools | Factory default | Notes |
|---|---|---|---|
| Low-temp | MAX fiber source | Constant mode, 25 °C (shown in manual) | MAX typically specifies 22–25 °C. Match the source's label; do not go below 20 °C. |
| High-temp | Cutting head optics | Confirm on unit | Run 3–5 °C above the low circuit and above room dew point. Humid Florida shop: 28–30 °C is safer than 25. |
Intelligent mode sets water temperature relative to room temperature (factory offset −2 °C). It saves energy and avoids condensation but lets source temperature drift with the room; constant mode is the safer default for the laser source.
Controller (T-506H panel)
- Lights: INT Ctrl = intelligent mode · CT Ctrl = constant mode · PARAM Set = parameter mode.
- Change a setpoint: press SET, adjust with ▲▼, press RST to save. No key for 20 seconds exits without saving.
- Advanced menu: hold ▲ and press SET for 5 seconds; password 8. Don't change anything here without support.
- Factory reset: hold keys at power-up until "rE" shows.
- Silence alarm: any key. The code stays on the display until the fault clears.
Alarm codes
| Code | Meaning | Check first |
|---|---|---|
| E1 | Room temperature too high | Ventilation; room over 45 °C; filter screen clogged |
| E2 | Water temperature too high | Filter screen; fan running; condenser dusty; room temp; low water |
| E3 | Water temperature too low | Setpoint set too low; sensor; cold shop at startup |
| E4 | Room temperature sensor fault | Sensor plug; call support |
| E5 | Water temperature sensor fault | Sensor plug; call support |
| E6 | Flow / external alarm | Low water; kinked hose; air in lines after a fill (clears in a few minutes); pump |
First start
- Position with 50 cm (20 in) clear above the top fan and 30 cm (12 in) clear at the side air inlet. Casters locked.
- Fill through the rear supply lid with distilled or deionized water, slowly, watching the level gauge. Stop in the green NORMAL band.
- Connect supply and return for both circuits to the machine. Source circuit and optics circuit are separate pairs — don't cross them. Check every clamp.
- Plug into its own 240 V 60 Hz circuit. Switch on; the pumps start immediately.
- Watch for leaks for the first minute. Bubbles can trip E6 briefly while air purges — normal.
- Re-check the level after the lines fill and top up. Confirm both setpoints before the laser is enabled.
Allow 5 minutes between power cycles so the compressor can equalize.
Maintenance
| Interval | Do |
|---|---|
| Daily | Glance at the level gauge and both temperature readouts before enabling the laser. |
| Monthly | Pull the side filter screen, wash it, dry it, refit. Check hoses and clamps for weeping. |
| Every 3 months | Drain and refill with fresh distilled/DI water. Monthly in a dusty or hot shop. |
| Every 6 months | Blow out the condenser fins with low-pressure air from the inside out. Check casters and level. |
| Yearly | Inspect pump for noise, check refrigerant performance (cold air at the outlet), verify alarm relay to the machine. |
| Before a freeze | Drain completely or move to a heated space. Water in the tank below 0 °C cracks the pump and plate heat exchanger. If antifreeze is unavoidable, ask [email protected] for the approved mix — household glycol attacks the seals. |
Water
- Use: distilled, deionized or purified water. Nothing else.
- Never: tap water (scale on the heat exchanger), well water, additives, or automotive coolant.
- Signs it's overdue: cloudy tank, green tint, slime on the gauge, rising source temperature at the same setpoint.
- Why it matters: the laser source's cooling channels are small. Scale or biofilm there is a warranty conversation.
Symptoms
| You see | Likely cause |
|---|---|
| Machine won't enable the laser; chiller alarm light | Any E-code — read the panel first |
| Source temperature creeping up over a shift | Dirty filter or condenser; room too hot; low water; water overdue |
| Condensation on the cutting head or lens fogging | Optics circuit set too cold for the humidity; raise the high-temp setpoint |
| Frequent E6 after a water change | Air in the lines — let it run; top up the tank |
| Chiller cycling on and off rapidly | Power-cycled too fast; wait 5 minutes; check supply voltage under load |
| Pump loud or cavitating | Low water; kinked return hose; pump wear |
Manuals and links
| Document | Where |
|---|---|
| S&A CWFL-800 / 1000 / 1500 User Manual (28 pp, dual-temperature chiller) | manualslib.com — CWFL-800/1000/1500 |
| S&A CWFL-1500 product page — manuals and FAQ | manualslib.com — CWFL-1500 |
| Teyu CWFL-1500 spec page (ANP / BNP revisions) | teyuchiller.com — CWFL-1500 |
| Teyu: connecting a CWFL-1500 to a 1500 W fiber cutter | teyuchiller.com — connection guide |
| S&A / Teyu technical support | [email protected] |
| Thunder Laser USA support | thunderlaserusa.com · knowledge base · (903) 522-4070 |
Manual pages for the CWFL-1500 are shared with the 800 and 1000; specs differ by model, use the 1500 column. Setpoint defaults and the heater option vary by revision — read the nameplate on your unit.
Still stuck?
Fastest response times in the industry from our US-based support team.