
Overview
Standard Lenses
F-160
F-210
F-290
Non-Standard Lenses
F-110
Generic Lenses
Setting & Adjusting Autofocus
6.1 Jhc Serials tool — For AURORA 8 Only!
-
Find the USB cable of Auto-focus board that came with the Fiber machine.

-
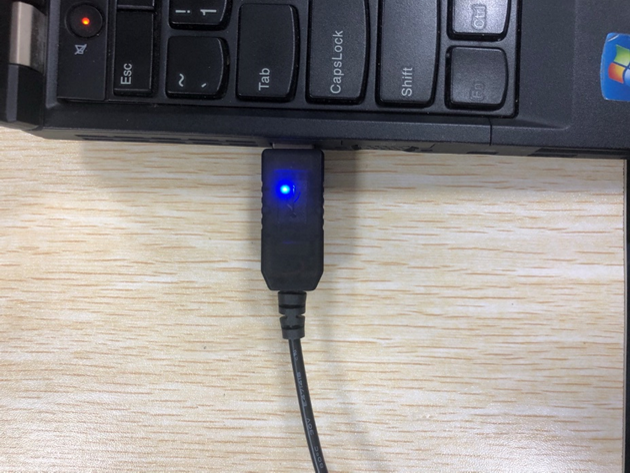
Loosen the 6 fixing screws of the top cover of the fixed marking machine (please keep the screws), move the top cover to the right, move it to see the auto focus plate, and connect the USB cable to the auto focus plate "UStart" interface, the other end is connected to the computer end.


-
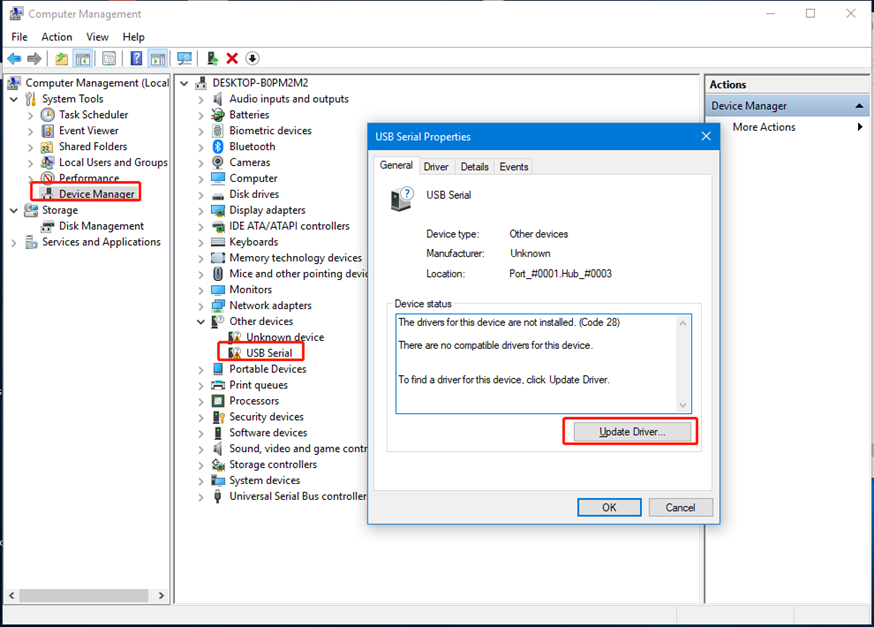
Install USB driver: Right click "computer>>Management>>device manager>>Other devices>>USB Serial>>Update Driver>>Browse my computer to driver software>>Find the Driver folder that came with the machine CD340G-USB-Drive>>Next>>Install successfully.
And find the corresponding COM of the USB, and remember it.
The auto-focus software driver folder in the U-disk that came with the Fiber machine.


-
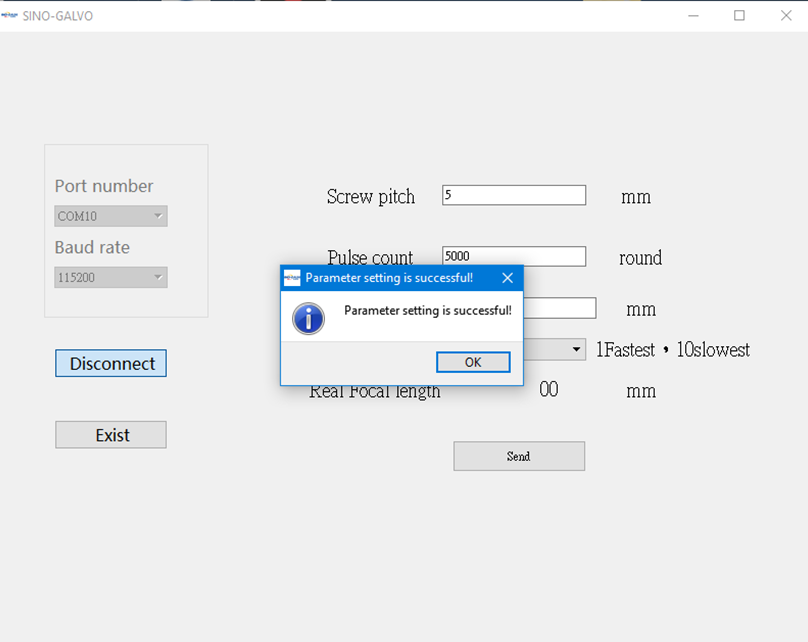
Choose correct COM port and click connect, then set the screw pitch as 5, Pulse count as 5000. Speed as 1 (divided into 10 gears, 1 fastest, 10 slowest, 1-10 decreasing speed), then click Send, successfully set window will be showed. And enter the focal length according to the recommended form.
Focal Length for different lens (for reference only)
F-160 F-210 F-290 AURORA 8 P:30%, S:100mm/s, Focus length range 218.14~219.52mm 274.71~278.17mm 398.03~401.08mm AURORA 8 PRO P:30%, S:100mm/s, PW:100ns Focus length range 220.56~222.64mm 273.84~276.56mm 395.52~397.1mm 
How to adjust the focus length
-
Install the USB driver first, and set the Screw pitch, Pulse count and Speed according to the steps in next part: How to set the focus length.
-
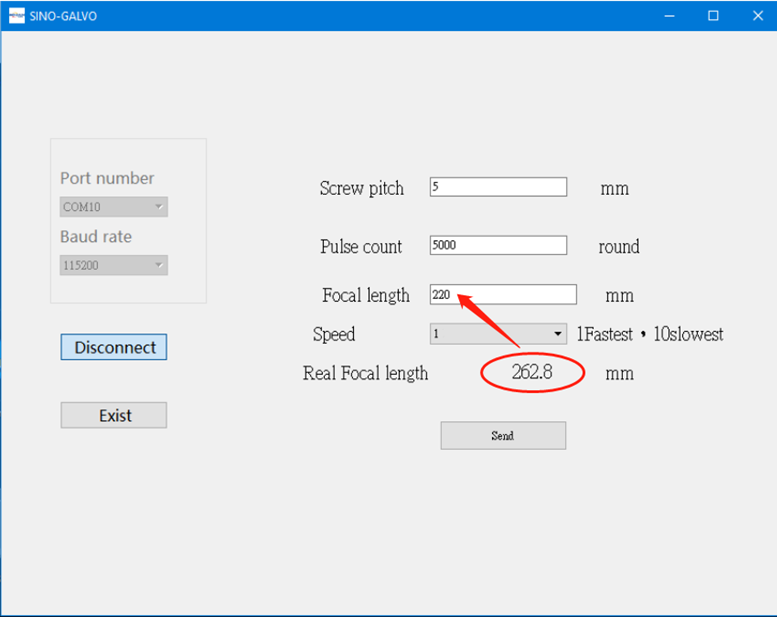
Open the marking software, place a piece of metal material on the work platform, draw a 10*10mm square in the software, set the marking parameters, it is recommended to set the speed at 100mm/s and the power at 30%. Low-speed marking makes it easier to observe changes in focal length. Click on the red light, align the material, and click on the mark. During the marking process, press the up or down button of the marking machine to observe the beam. When the beam is brightest, it is the best focus. At the same time, it can be observed that the actual focal length column in the auto-focus adjustment software is constantly changing, and the actual focal length when the beam is at its brightest is recorded. How to use the Fiber laser, you can refer to Chapter 6.
And below form is for reference. You can enter them in auto-focus software or adjust based on them.
F-160 F-210 F-290 AURORA 8 P:30%, S:100mm/s, Focus length range 218.14~219.52mm 274.71~278.17mm 398.03~401.08mm AURORA 8 PRO P:30%, S:100mm/s, PW:100ns Focus length range 220.56~222.64mm 273.84~276.56mm 395.52~397.1mm -
Enter the recorded real focal length value into the set focal length input box, click "send" again, the software will return to the successful setting, the parameters will be stored by the software, and the system will automatically move to this position by clicking the auto focus button again.
TL-tool — For AURORA 8 PRO Only!
How to set the focus length of Auto-focus
-
Find the USB cable of Auto-focus board that came with the Fiber machine.

-
Loosen the 6 fixing screws of the top cover of the fixed marking machine (please keep the screws), move the top cover to the right, move it to see the auto focus plate, and connect the USB cable to the auto focus plate interface, the other end is connected to the computer end.

-
Install USB driver: Right click "computer>>Management>>device manager>>Other devices>>USB Serial>>Update Driver>>Browse my computer to driver software>>Find the Driver folder that came with the machine CD340G-USB-Drive>>Next>>Install successfully.
Find the corresponding COM of the USB, and remember it.
The auto-focus software driver folder in the U-disk that came with the Fiber machine.


-
Choose correct COM port and click connect, then set the screw pitch as 5, Pulse count as 5000. Speed as 2 (divided into 9 gears, 1 fastest, 9 slowest, 1-9 decreasing speed), then click Send, successfully set window will be showed. And enter the focal length according to the recommended form.
Focal Length for different lens (for reference only)
F-160 F-210 F-290 20&50WATT P:30%, S:100mm/s, Focus length range 218—219.5 mm 274.7—278.2 mm 398—401.2mm 20 WATT(MOPA) P:30%, S:100mm/s, PW:100ns Focus length range 218—219.5 mm 274.7—278.2 mm 398—401.2mm
How to adjust the focus length
-
Install the USB driver first, and set the Screw pitch, Pulse count and Speed according to the steps in last part How to set the focus length.
-
Open the marking software, place a piece of metal material on the work platform, draw a 10*10mm square in the software, set the marking parameters, it is recommended to set the speed at 100mm/s and the power at 30%. Low-speed marking makes it easier to observe changes in focal length. Click on the red light, align the material, and click on the mark. During the marking process, press the up or down button of the marking machine to observe the beam. When the beam is brightest, it is the best focus. At the same time, it can be observed that the actual focal length column in the auto-focus adjustment software is constantly changing, and the actual focal length when the beam is at its brightest is recorded. How to use the Fiber laser, you can refer to Chapter 6.
And below form is for reference. You can enter them in auto-focus software or adjust based on them.
F-160 F-210 F-290 20&50WATT P:30%, S:100mm/s, Focus length range 218—219.5 mm 274.7—278.2 mm 398—401.2mm 20 WATT(MOPA) P:30%, S:100mm/s, PW:100ns Focus length range 218—219.5 mm 274.7—278.2 mm 398—401.2mm -
Enter the recorded real focal length value into the set focal length input box, click "send" again, the software will return to the successful setting, the parameters will be stored by the software, and the system will automatically move to this position by clicking the auto focus button again.
Still stuck?
No bots, no runaround. Talk to a U.S.-based laser tech who knows your Aurora inside out.