
Applies to: Thunder Laser Titan and Titan Pro series | You'll need: 2.5 mm Allen wrench (for rear panel), magnets or pinning devices, optional external support stands
What is the passthrough used for?
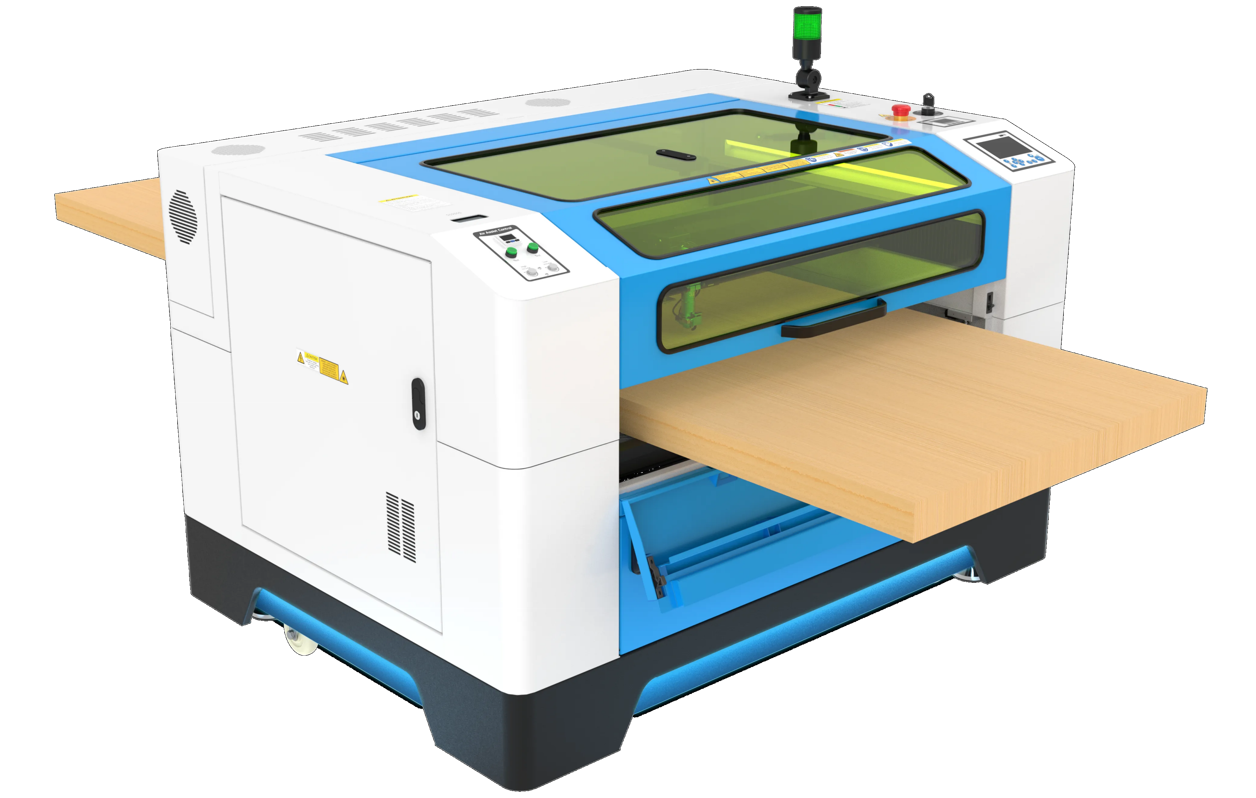
The passthrough allows oversized objects to fit in the machine. Your Thunder Titan has a flip-down front door and a rear removable slot. Material can hang outside the machine on either side while being processed.
The passthrough door height is approximately 70 mm. It supports materials with a maximum thickness of approximately 65 mm.
Step 1 — Open the front passthrough door
Locate the front passthrough door on your machine.

Front panel opening: Push outward with your hand to open the front passthrough.
| Closed | Open |
|---|---|
 |
 |
Step 2 — Remove the rear panel (if needed)
If you do not need to push material through the rear passthrough, you can leave the rear panel installed.
To remove it: use a 2.5 mm Allen wrench to remove the screws holding the rear passthrough panel. Remove the panel and store it safely.

Step 3 — Position the honeycomb table and secure your material
Set the honeycomb table to be level with the body frame.
- Thin materials: Place flat on the honeycomb table and secure with magnets or fixed tools.
- Longer or thicker materials: Place flat on the honeycomb table and use external stands for support if necessary.

Step 4 — Safety and exhaust considerations
- The top cover of Titan series machines is made of standard transparent tempered glass, which effectively blocks laser radiation emitted by the laser source.
- The top cover of Titan Pro series machines includes an additional yellow-green protective panel compared to the Titan series, which effectively blocks laser radiation emitted by both RF and Fiber laser sources.
Exhaust performance will be reduced with panels removed, and residual smoke and smells may escape into the room. Only run with passthrough panels removed when necessary.
Step 5 — Run the job
- Place the material flat on the honeycomb table and secure it. If needed, use shelves or stands in front and behind the machine to support the long material sheet and keep it flat.
- Download the job file to the machine. Set Origin, Focus, and Frame as needed.
- Bypass the door safety interlocks manually. By doing this, you accept all the risk and results of running the machine in its altered state.
- Press the Start button to begin the job.
Still stuck?
No bots, no runaround. Talk to a U.S.-based laser tech who knows your Titan inside out.