
Preface: This article covers the Manual Jog Screen on the Thunder Laser Bolt
Quickstart Video
Complete Guide
The Manual Jog screen allows the user to Nudge, Absolute Move To and toggle between High and Low speed jogging quickly. This jog screen gives the user ultimate control on moving the laser head. The screen needs to be broken down into sections and the functions for each mode are set independently and which buttons do what based on the user input varies.
There are two sets of jog buttons, the physical jog buttons that are below the touch screen and the touchscreen buttons that are on the Manual Jog screen.
Areas of Control
The screen can broken down into 3 major sections highlighted in the picture below
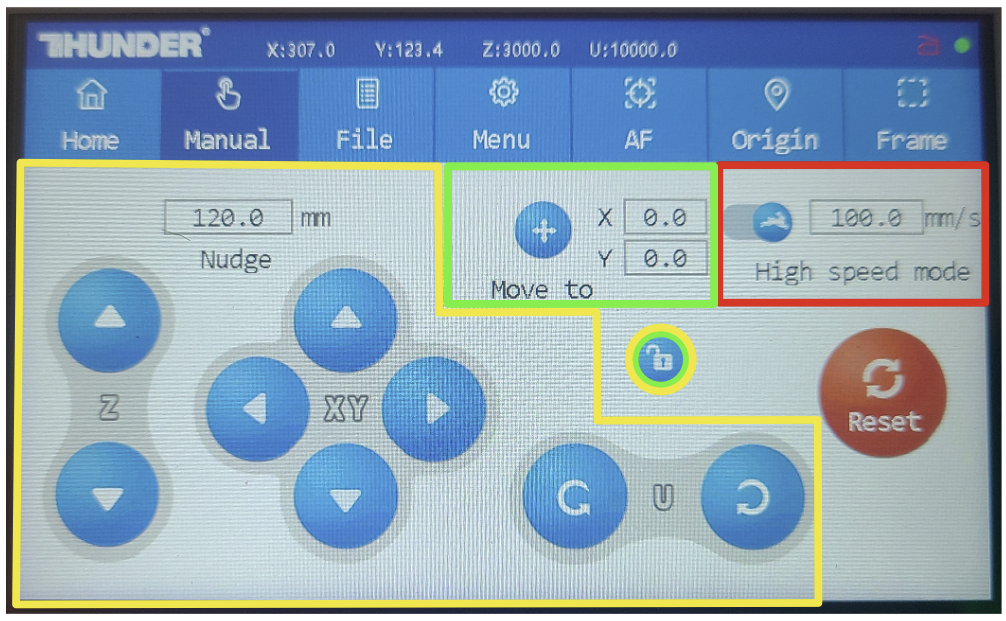
- Yellow = Nudge functions
- Green = Move To (Absolute Moves)
- Red = High and Low Speed Jogs
Red Reset Button — This is used to reset the X and Y Axes. The laser head will home to the back left corner to establish the 0,0 absolute origin of the machine.
How to Use the Different Move Types
Nudge
Nudge is perfect for when you want the laser head to move a precise distance. Like if you are wanting to line up to the corner of your material that is only 1-2mm away from the Red Dot Pointer but the normal jog arrows jump back and forth too quickly.
Keys to Success with the Nudge:
- You must unlock the Nudge functions with the Unlock Button

- You must set a Nudge value to a non zero value

- Only the buttons in the yellow region are affected by Nudge. The physical buttons are not affected by Nudge
Nudge can also be very useful for a "One Button Press" to lower the Honeycomb bed in preparation for a Rotary job. Set the value to like 120mm and press the Z down arrow.
Move To
Move To allows the user to move the laser to know positions. This is good for jig positioning type control where you have known coordinates of reference.
Keys to Success with the Move To:
- You must unlock the Move To functions with the Unlock Button

- Move To operates at a fixed speed of 200mms and is not affected by the High and Low Speed settings
How to use Move To:
Enter the position you want the Laser to move to by pressing either the numeric entry box for the X or Y position and enter values in the pop up

Press OK on the Pop Up, then press the 4 Arrow button to imitate the Move To function

High and Low Speed
High Speed and Low Speed mode only affect the Physical buttons below the screen. These modes allow the user to quickly move the laser head to a position and then enable the Low Speed setting to be able to do a much more fine move when positioning the Red Dot.
Keys to Success with High and Low Speed:
- Set the values to reasonable values. 100mms for High and 10mms for Low are good starting values
- Know that they speeds only affect the the Physical Buttons
How to use High and Low Speed:
- Set the High and Low Speed Values by pressing the numeric entry box, then in the Pop Up, enter the desired values and press OK

- Select between High (Rabbit) and Low (Turtle) by pressing the icon next to the numeric entry box to toggle between the speeds

Still stuck?
No bots, no runaround. Talk to a U.S.-based laser tech who knows your Bolt inside out.