
RotoBoss Roller Rotary Setup
Preface: This Article covers how to set up the rotary to get your steps right for a given tumbler and some best practices. This article is relevant for Thunder Laser Gantry style Lasers with Ruida Controllers. The information contained in here is not necessary relevant to the Aurora Series Lasers.
Quick Start Video
Complete Guide
This guide is long and tries to cover the basics but not every scenario possible. We highly suggest you read through this guide on tips, tricks and watchouts for operating a Roller Rotary on a Thunder Laser Nova, Odin or Bolt series laser.
Setup
Please refer to the quick start video at the top of this article for the detailed process of setting up the rotary.
Basic Steps
- Placing the rotary in the machine (Either on Honeycomb, hangers or tray)
- Lower the Honeycomb down\Support Rails for clearance
- Install Rotary to honeycomb, tray or support rails
- Plug the rotary into the port
- Place the tumbler in the rotary. Adjust the width of the rotary to fit
- Adjust the height of the tail wheels so that the rotary is even to the laser head at the desired focus distance for the lens you are using
Find and Set your Steps
Default Steps\Roller Diameter
Use these as the starting point as you dial in the steps based off the shape of the object you are engraving
| Rotary | Steps | Roller Diameter Inches (mm) |
|---|---|---|
| RotoBolt | 4300 | .94(24) |
| Low Roller | 4400 | 1.73(44) |
| Junior | 4400 | 2.32 (59) |
| RotoBoss | 4400 | 2.32 (59) |
*for other roller rotaries, please refer to the OEM manual and documentation
How to Access the Rotary Set up Tool In Lightburn
You will need to adjust these settings based on the tumbler shape you plan to run. You can adjust the values without having to re-send the job.
| Laser Tools > Rotary Setup | Enter Appropriate Data Here |
|---|---|

*Note the shortcut command of Ctrl+Shift+R for Windows |
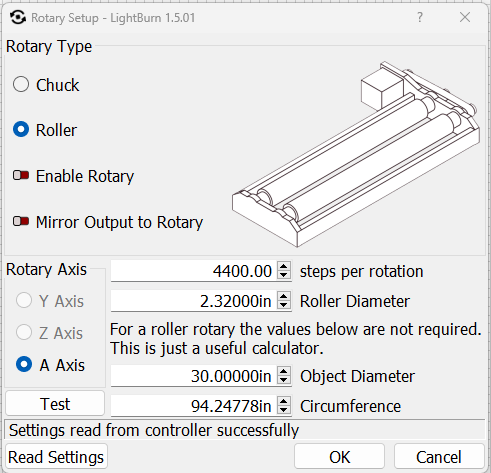
|
Basic Method for Dialing in Steps
This basic tape method can be used for general, 1 sided, engraves. If you desire to do dual sided or full wraps, you will need to perform additional steps to make sure you have the most accurate setup. Use the table above to set the default Steps\Roller diameter for the rotary you are using. There are other ways to find your steps, this is just a single example.
- Use a piece of masking tape and a ruler to mark 3 dots on the tape at the 0, 2 and 4" marks
- Place the tape on the tumbler, wrapping it around as even as you can
- Set up a 4 inch by .5" rectangle in Lightburn. Use a Middle Left User Origin.
- Send the job to the machine
- Set the tumbler into the rotary and manually focus so that the tumbler surface is even to the laser head across the engraving area
- Set the Origin with the red dot on the 2" mark on the tape
- Frame the Job from the controller. Watch how the laser Red dot crosses the 0 and 4" marks
- If the Red dot crosses inside the 0 and 4" marks, increase the Steps and repeat step 7. If the Red dot crosses outside the 0 and 4" marks, decrease the Steps and repeat step 7
- Once the Red dot crosses over the 0 and 4" marks, your steps are set and your rotary is set up for a basic 1 side engrave
Additional References
- Rotoboss Manual
- Circle Projection on Tumbler
- Rotary Roller Diameter Calculation
- Size is incorrect when you using the rotary attachment
- Rotary Axis no motion troubleshooting
Video:
Still stuck?
Fastest response times in the industry from our US-based support team.