
Thunder Laser Nova Laser Power Supply (LPSU) Output Current Test Procedure
Preface: This is a diagnostic procedure to collect data on the output of the LPSU. It is not necessary to perform this unless instructed to do so by Thunder Laser USA Support & Innovation Labs. But you can if you like. This instruction is specific to
LightBurn Material Library.clb · Import into LightBurnLightBurn Material Library.clb · Import into LightBurn
How to import
- Download the
.clblibrary file above. - In LightBurn, open the Material Library window (Window ▸ Material Library).
- Click the load icon and choose Load an existing library, then select the downloaded
.clbfile. - Assign settings to a layer by double-clicking an entry.
Provided as-is for Thunder Laser USA customers. Always run a test cut on scrap first — settings vary by material and machine. Please do not redistribute.
Preface: This is a diagnostic procedure to collect data on the output of the LPSU. It is not necessary to perform this unless instructed to do so by Thunder Laser USA Support & Innovation Labs. But you can if you like. This instruction is specific to the Thunder Laser USA Nova Glass Tube machines only, all wattages.

Please reply back to your support ticket with your results in an organized fashion, please avoid just sending a video of the LPSU
The Procedure:
This
procedure runs the Lightburn file and allows you to view the LPSU ammeter to
record the ma output values at the LPSU. The file will start with a 10 second fan delay and then proceed to draw ten lines with five second pauses between lines. Each line will step the power level up by 10%, starting at 10% all the way to 100%. While the machine is outputting, the operator should be recording the
values from the power supply milliamp meter. In between power levels, the Air assist should toggle between high and low air between each power step to help indicate the change.
 Your laser will fire during this test. It is recommended to lower the bed down and clear the bed and crumb tray from any materials and foreign objects.
Step 1: Download the attached Lightburn file
The file is a run file and not a Lightburn project file and should not be imported to Lightburn as a project/vectors , instead you will use the downloaded RD file from  and transfer it to the Laser using Lightburn's Upload feature in the File List tab.
and transfer it to the Laser using Lightburn's Upload feature in the File List tab.The file is set up to run a small set of lines in the Top Left corner using absolute coordinates. The job will need about 5" of space in x and y to be able to run.

Transfer the downloaded LPSUCRT2.RD file using Lightburn:
Do not edit or rename the file. Transfer it as is.
|
Enable the File List Window in Lightburn
|
Select the File List Window Tab |
 |
 |
|
Check that you are Connected and Ready
|
Upload the File to the machine
|
 |
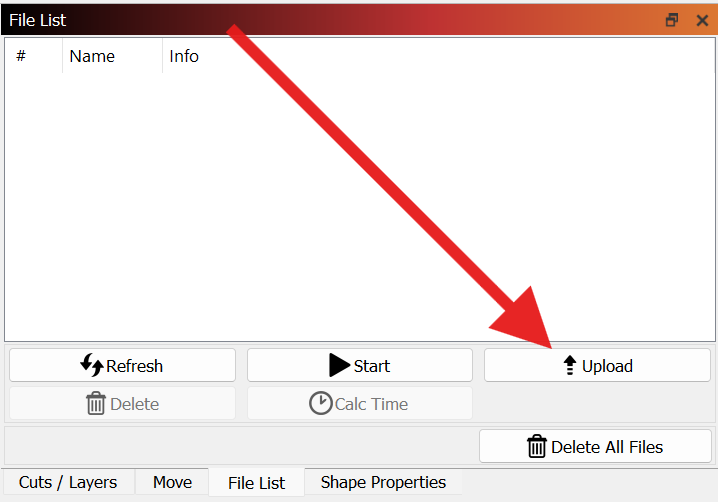 Click the upload button and navigate where you saved the RD file and select it and upload it. |
If you are unable to successfully upload the File from Lightburn, then you can use a USB stick to copy it to the machine. Please see this article for details on transferring a RD file to your Thunder Laser.
Here is a video on how to upload:
Step 2: Locate Power Supply for your machine
Nova 35, 51, and 63
Located on the back of the machine, behind the blue door to the Left of the exhaust outlet
|
Nova 35,51, and 63 General Location
|
Example of the LPSU
|
 |
 |
Nova 24:
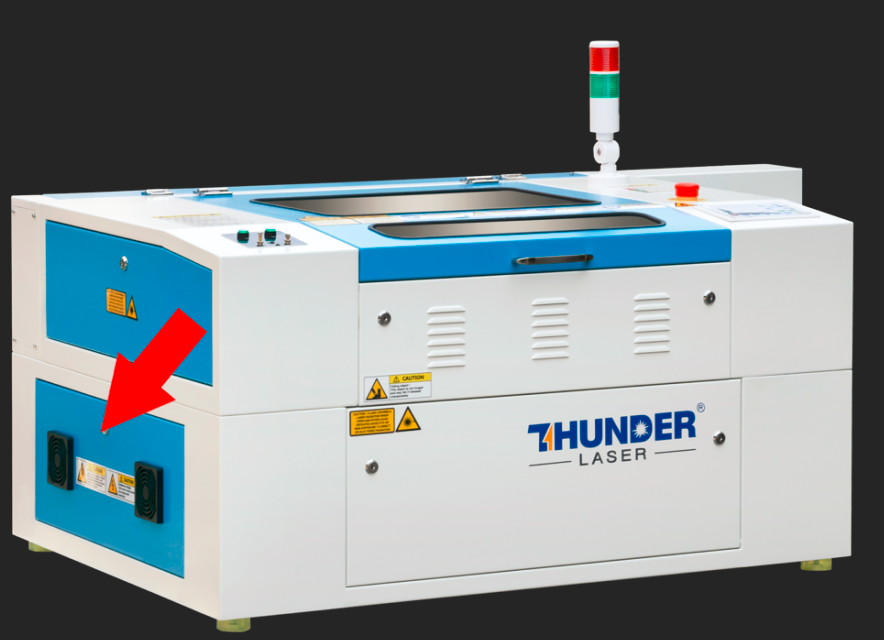
Located on the left side of your machine behind the lower blue door.
|
Nova 24 LPSU Location
|
Example of the LPSU
|
 |
 |
Step 3: Run Job and Data Log
Get your pen and paper ready. It would be good to make a column for 10-100% power in increments of 10 so that you will be ready to capture the output ma values.
Load the file you uploaded on the machine screen. You will need to select the job from the file list to get the preview on the machine.
Record the results and email them back to your ticket.
|
Power Percent
|
ma Readout |
|
10
|
|
|
20
|
|
|
30
|
|
|
40
|
|
|
50
|
|
|
60
|
|
|
70
|
|
|
80
|
|
|
90
|
|
|
100
|
Recommended Tube Current Limits:
| Tube Wattage |
Starting Current milliamps (ma)
|
Nominal Peak milliamps (ma)
|
Max milliamps (ma)
|
|
40 watt
|
5 ma
|
18 ma
|
20 ma
|
|
60 watt
|
5 ma
|
18 ma
|
20 ma
|
|
80 watt
|
24 ma
|
28 ma
|
|
|
100 watt
|
5 ma
|
24 ma
|
25 ma
|
|
130 watt
|
6 ma
|
28 ma
|
30 ma
|
Sample Results:

