
Preface: This article covers the use of the Thunder laser auto focus software and some of the basics of setting up the new Lens in EzCad3 or Lightburn. It does not cover the topic of finding the optimum focal distance.
Quick Start Video
Complete Guide
Things you need to get started:
- Windows PC
- TLtool Software (Find on USB stick or Thunder Laser Aurora Galvo Focus Height Software)
- Aurora V2 Manual
- Lens and Cor File from USB
1. Gather data on which Lens you are installing
Compiled data from the manuals (Check the manual on your USB or the KB for the latest information)
| Lens | Nominal Focal Range mm (in) | Aurora Version |
|---|---|---|
| F-160 | 218.14-219.52mm (8.588-8.642in) | 1.0 |
| F-210 | 274.71-278.17mm (10.815-10.952in) | 1.0 |
| F-220 | 304.71-308.17mm (11.994-12.133in) | 1.0 |
| F-290 | 398.03-401.08mm (15.670-15.791in) | 1.0 |
| F-210 (PRO) | 220.56-222.6mm (8.683-8.764in) | 1.0 PRO, 2.0 |
| F-210 (PRO) | 273.84-276.56mm (10.781-10.888in) | 1.0 PRO |
| F-220 (PRO) | 303.84-306.56mm (11.962-12.069in) | 2.0 |
| F-290 (PRO) | 395.52-397.1mm (15.572-15.634in) | 1.0 PRO, 2.0 |
| F-170 (UV) | 266-269mm (10.472-10.591in) | 2.0 UV |
| F-254 (UV) | 310.85-375.44mm (12.238-14.781in) | 2.0 UV |
2. Make Connections to the TL AutoFocus board
Aurora 1.0
| Cable from Tool Pouch | Plug in Here (top of machine) |
|---|---|
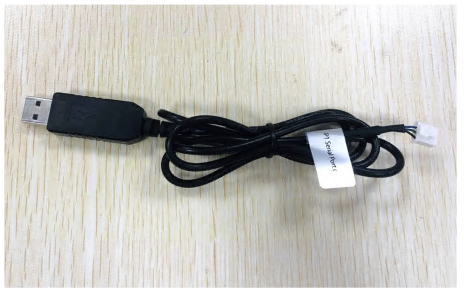 |

Access the TL Focus board by removing the 6 bolts holding the top cover of the machine to the frame. |
Aurora 2.0
You are in luck. The cable you use to connect to the machine goes to an internal hub which has the Tl Focus Board connection already made.
4. Power On the Machine
Turn the Interlock Key to the On Position and Press the On button so that the Red Led at the ON button is Solid Red. If you attempt to send data to the controller without fully turning it out, you will lock up the communications.
| Incorrect | Correct |
|---|---|
 |
 |
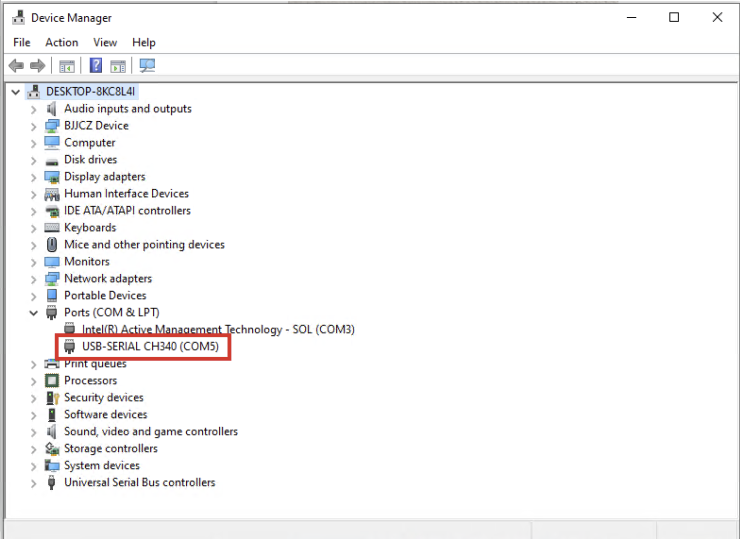
4. Check which Com Port you need to use
Open up Windows Device Manager and look for a CH340 device under the Ports (Com & LPT) section
5. Open the Software
Run the software. Depending on if it is on your USB stick or you recently downloaded it from the KB, your file location may differ than what is shown below.
Be sure to extract the software from the Zip file and right click on it and "run as admin". You may have to also tell Windows Defender that it is ok to run.
Right click on TLTool.exe and "Run as Admin"

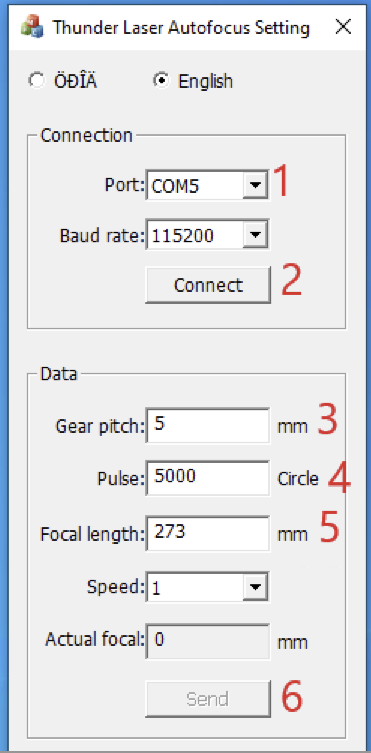
6. Connect and Set Focal Height
- Change Comm port to what was determined above
- Click "Connect". At that point it will read the TL Focus Board and the Send button will become active
- Set Gear Pitch to 5
- Set Pulse to 5000
- Set your Focal Distance from the table above based on the lens you are swapping to
- Click "Send" and get the send success message
Success:

7. Change Cor File\Profile in Ezcad or Lightburn
You must select the correct Cor file for your installed lens:
Ezcad

Lightburn Device Settings
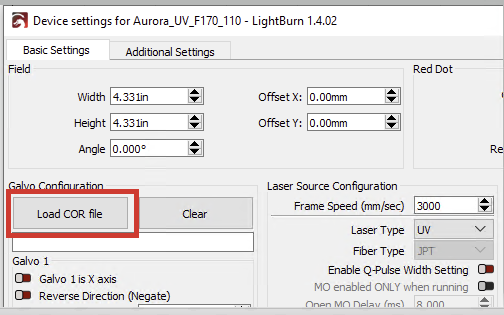
You can go through the process of loading the Cor file each time in Ezcad but your parameter library will not necessarily work the exact same for all the Lens options. Thunder Laser USA suggests that you create separate copies of the EzCad folders and have each one setup for a different Cor File and Lens. You can have multiple device profiles in Lightburn to accomplish the same thing:
Ezcad
Each folder has separate settings for each Lens, the shortcuts for Ezcad3 are then pointed to the corresponding folder

Lightburn

Why are there different Focus Values in the manual and where should I measure to
So the distance that you enter for the Autofocus sensor is different than the distance from the lens to the material. The reason is because the Autofocus sensor is mounted in the galvo head, above the lens, so it has an offset to it. The image below should help clarify.

Reference Articles
- Thunder Laser Aurora Galvo Focus Height Software
- Aurora Series Unified User's Manual
Still stuck?
No bots, no runaround. Talk to a U.S.-based laser tech who knows your Aurora inside out.