
Understanding Speed Units: Why Your Software and Your Machine Show Different Numbers
Overview
Your Thunder Laser machine always runs at a speed measured in millimeters per second (mm/s). That never changes. What does change is the unit your design software chooses to display that speed in — and depending on your software, your version, and your settings, the same physical speed can appear on screen as five completely different numbers.
This article explains the five speed units you may encounter in LightBurn, LaserMaker, and RDWorks, gives you conversion ratios and a lookup table, and shows you where to check and set your units so the number you type is the speed you actually get.
A units mismatch is a real fire and material-damage risk, not just a bad result.
Thunder Laser publishes all recommended settings in mm/s. If your software is displaying mm/min and you type our number in directly, your machine will run 60 times slower than intended — enough to ignite most materials. Always confirm your speed unit before running a job, and never leave a running machine unattended.
Think of It Like a Car Speedometer
Picture two cars driving side by side down the highway at exactly the same speed. One has a speedometer reading 65. The other reads 100. Neither driver is going faster than the other. The first car displays miles per hour; the second displays kilometers per hour. Same physical speed. Different unit. Different number.
Now imagine you switch your dashboard from MPH to KM/H. The car does not accelerate. The needle jumps to a bigger number, but nothing physically changed — only the label and the arithmetic behind the display.
Your laser works exactly the same way. The gantry moves at whatever physical speed the controller commands. Your software's unit setting is the dashboard. Changing it changes the number you read, not the actual speed the machine moves.
The problem starts when someone hands you a number without telling you which dashboard it came from. If a friend says "take that curve at 65" and they meant km/h but you are reading mph, you enter the curve at over 100 km/h. That is precisely what happens when a customer copies a setting of 20 mm/s into a software field that is actually expecting inches per minute.
The Idea | Reference Image |
|---|---|
① Two dashboards, one speed. A speedometer marked in both MPH and KM/H shows 65 and 100 at the same instant. The car has one physical speed; the dial has two ways to show it. | 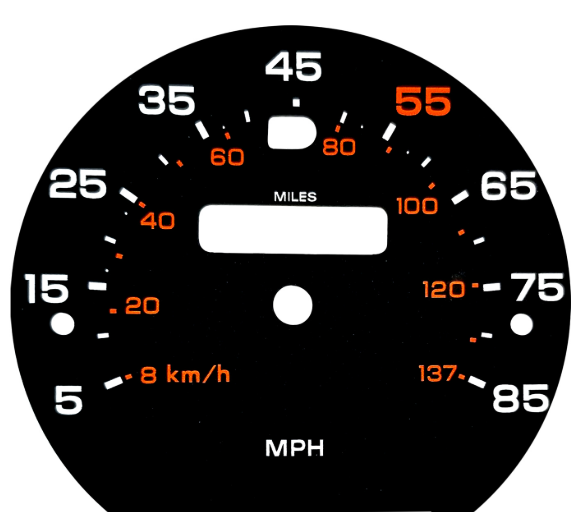 |
② Two software screens, one machine speed. The same cut layer shown in mm/s and in in/min displays 20 and 47.24. The laser head moves identically in both cases. | 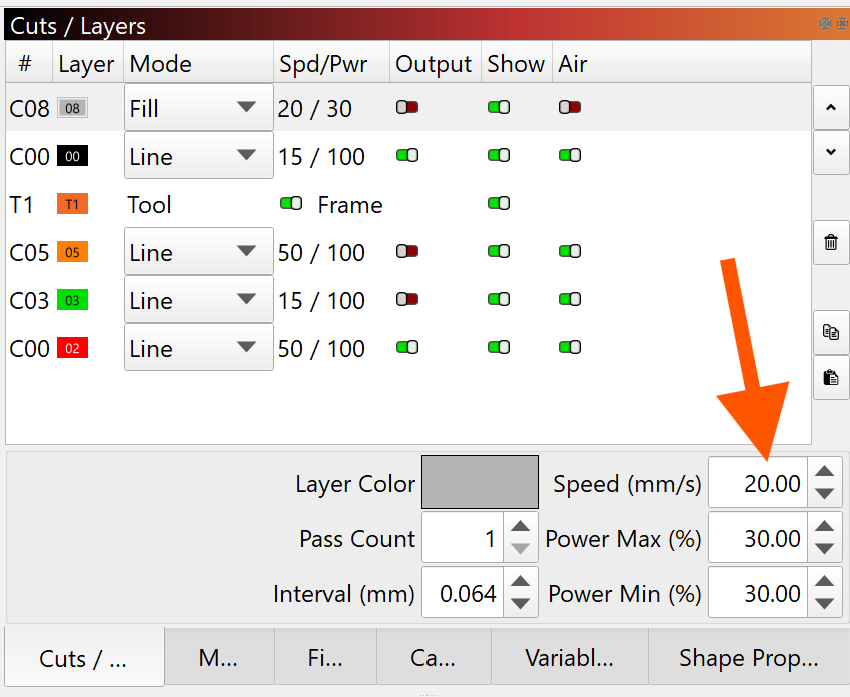 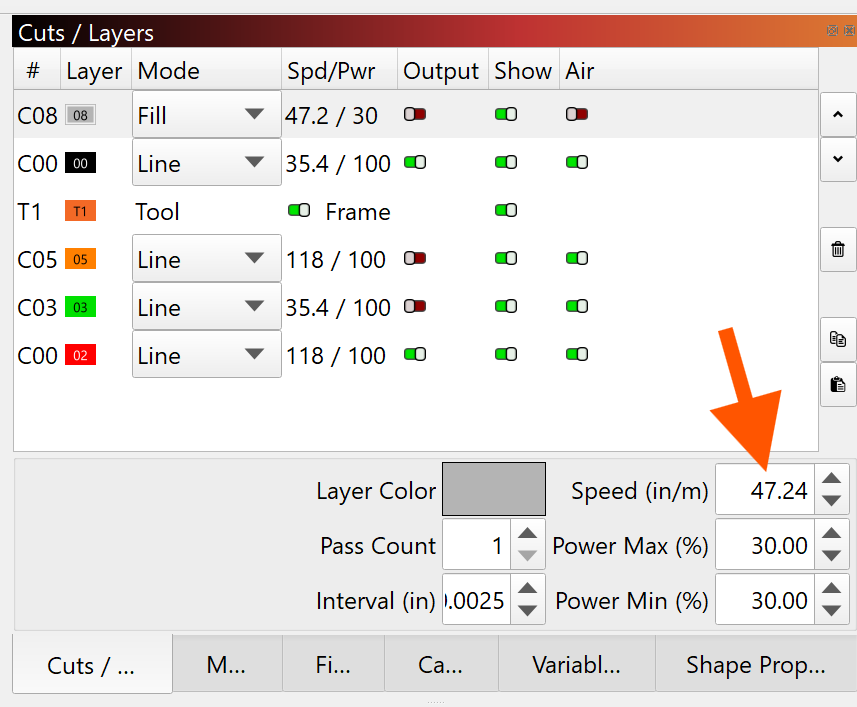 |
The Machine Only displays mm/s
Every gantry Thunder Laser machine uses a Ruida DSP controller. The controller stores and executes motion commands in millimeters per second, and it has no concept of inches or minutes. Every speed you see on the machine's own screen or control panel is mm/s.
When you press Send or Start, your design software converts whatever is on your screen into mm/s before it writes the job file. That conversion is automatic. The only thing that can go wrong is you typing a number that came from a different unit than the one your field is set to.

Changing your unit setting is safe. Switching your software from in/min to mm/s does not alter the physical speed of your existing layers — it recalculates and re-labels the number shown. Just like switching your car's dash from MPH to KM/H, the value on screen changes and the actual speed does not. After switching, verify one known-good layer against a published setting before running production work.
The Five Speed Units You May See
Speed units are built from two independent choices: a distance (millimeters, meters, or inches) and a time base (seconds or minutes). Between the three programs Thunder Laser customers use, five combinations show up:
Unit | Distance | Time Base | Where You'll See It |
|---|---|---|---|
mm/s | Millimeters | Seconds | The machine controller and screen. Available in LightBurn, LaserMaker, and RDWorks. Every Thunder Laser published setting. This is the reference unit and our recommended setting. |
mm/min | Millimeters | Minutes | LightBurn and LaserMaker. Common in the diode and GRBL world, so many online tutorials and shared settings use it. |
m/min | Meters | Minutes | RDWorks only. Meters, not millimeters — see the warning below this table. |
in/s | Inches | Seconds | LightBurn, LaserMaker, and RDWorks. |
in/min | Inches | Minutes | LightBurn and LaserMaker. Familiar to CNC router users, since feed rates are conventionally in in/min. This is the unit we see most often on machines that came to us with a speed problem. |
Do not confuse m/min with mm/min. They differ by a factor of 1,000.
RDWorks offers m/min — meters per minute. A great many settings shared online are in mm/min — millimeters per minute. The labels differ by a single letter and the speeds differ by 1,000×. A cut setting of 1,200 mm/min is a sensible 20 mm/s; the same 1,200 entered into an m/min field asks for 20,000 mm/s, which the controller will simply clamp to the machine's maximum — giving you a full-speed pass that cuts nothing and hides the mistake.
Conversion Ratios: Getting Back to mm/s
This is the table to keep handy. Find the unit your software is displaying, apply the multiplier, and you have the true machine speed in mm/s.
If Your Software Shows | Ratio to mm/s | To Get mm/s | To Go From mm/s | Worked Example |
|---|---|---|---|---|
mm/s | 1 : 1 | No conversion needed | No conversion needed | 100 mm/s = 100 mm/s |
mm/min | 60 : 1 | Divide by 60 | Multiply by 60 | 6,000 mm/min ÷ 60 = 100 mm/s |
m/min | 1 : 16.667 | Multiply by 16.667 | Multiply by 0.06 | 6 m/min × 16.667 = 100 mm/s |
in/s | 1 : 25.4 | Multiply by 25.4 | Divide by 25.4 | 3.94 in/s × 25.4 = 100 mm/s |
in/min | 2.3622 : 1 | Multiply by 0.4233 | Multiply by 2.3622 | 236.2 in/min × 0.4233 = 100 mm/s |
If you prefer to remember one thing: 1 inch = 25.4 mm, 1 meter = 1,000 mm, and 1 minute = 60 seconds. Every conversion above is just those facts combined.
Quick Reference: The Same Speed in All Five Units
Every row below describes one identical physical speed written five different ways. Find the mm/s value from a Thunder Laser setting in the first column, then read across to the unit your software is showing.
mm/s | mm/min | m/min | in/s | in/min |
|---|---|---|---|---|
5 | 300 | 0.3 | 0.20 | 11.8 |
10 | 600 | 0.6 | 0.39 | 23.6 |
15 | 900 | 0.9 | 0.59 | 35.4 |
20 | 1,200 | 1.2 | 0.79 | 47.2 |
30 | 1,800 | 1.8 | 1.18 | 70.9 |
50 | 3,000 | 3 | 1.97 | 118.1 |
100 | 6,000 | 6 | 3.94 | 236.2 |
200 | 12,000 | 12 | 7.87 | 472.4 |
300 | 18,000 | 18 | 11.81 | 708.7 |
400 | 24,000 | 24 | 15.75 | 944.9 |
500 | 30,000 | 30 | 19.69 | 1,181.1 |
1,000 | 60,000 | 60 | 39.37 | 2,362.2 |
What Goes Wrong When the Units Don't Match
Here is the scenario we see most often in support. A customer follows a Thunder Laser setting that reads “20 mm/s at 65% power” and types 20 into their speed box — without checking what unit that box is set to.
You Type 20 Into a Box Set To | Machine Actually Runs | Error Factor | What You'll See |
|---|---|---|---|
mm/s (correct) | 20 mm/s | Correct | Clean cut, expected edge quality, expected run time. |
in/min | 8.5 mm/s | 2.4× too slow | Heavy charring, wide kerf, melted or bubbled acrylic edges, scorched backside, and a job that takes far longer than expected. Elevated flare-up risk. |
mm/min | 0.33 mm/s | 60× too slow | The head crawls. This is a genuine fire hazard on wood, acrylic, paper, and fabric. Stop the job immediately. |
m/min | 333 mm/s (capped at the machine maximum, typically 300 mm/s) | 16.7× too fast | Engraving-speed travel on a cut layer. No cut, and a faint scorch line at best. |
in/s | 508 mm/s (capped at the machine maximum, typically 300 mm/s) | 25× too fast | No cut at all — a faint surface mark, or nothing. The head may also be clamped to the machine's maximum speed, hiding the true error. |
The same failure happens in reverse. A setting shared on a forum as “400 in/min” typed into an mm/s field gives you 400 mm/s instead of the intended 169 mm/s — well over twice as fast, with a washed-out, barely-there engrave.
Where to Check and Set Your Units
All three programs let you choose your speed unit. For a Thunder Laser machine we recommend setting all of them to mm/s, so that your software, our published settings, and your machine's own display all agree.
LightBurn 2.1 and later
LightBurn separates Control Units (used for speed and machine distances) from Design Units (used for the size and position of your artwork). They can be linked or independent.
Instruction | Reference Image |
|---|---|
① Open Device Settings from the wrench/screwdriver icon in the top toolbar. | 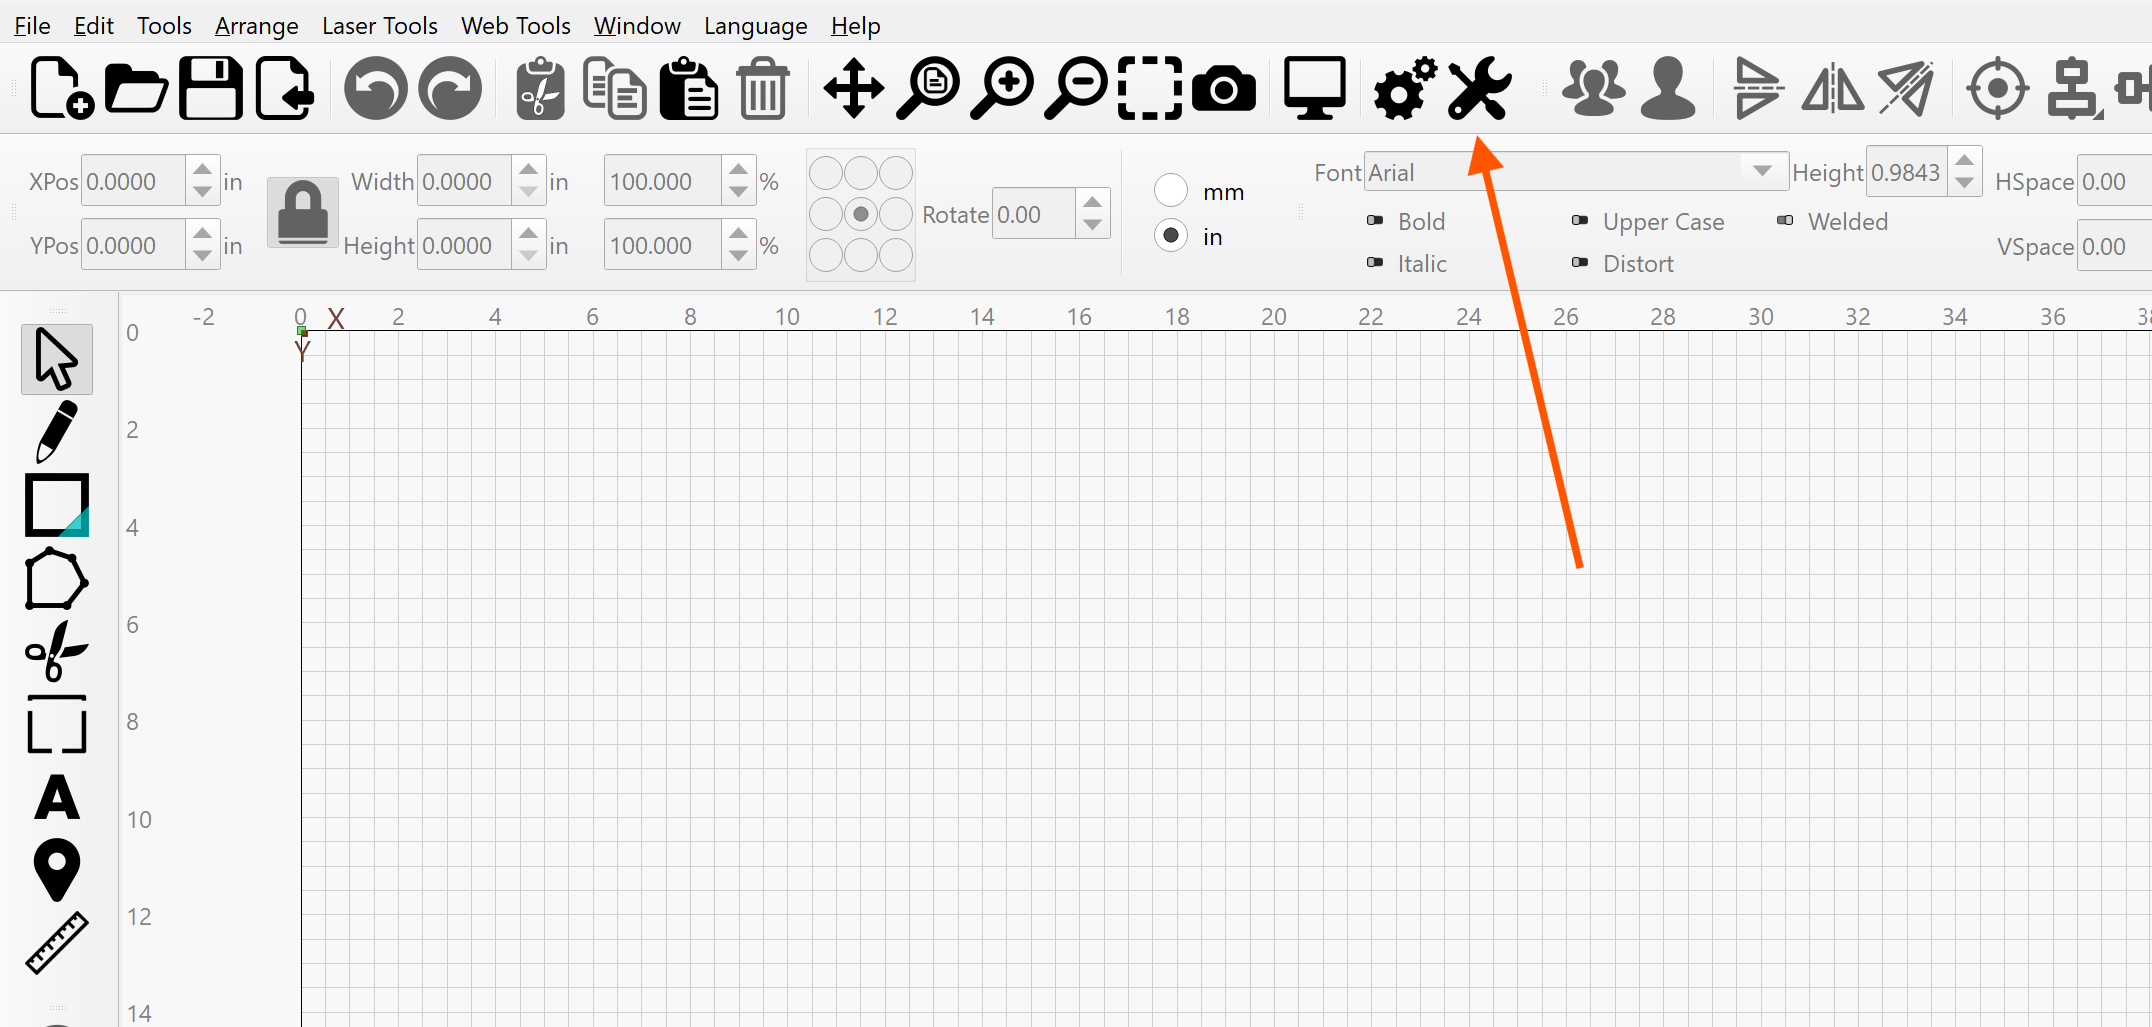 |
② On the Dimensions / Units tab, set the Control Units dropdown. | 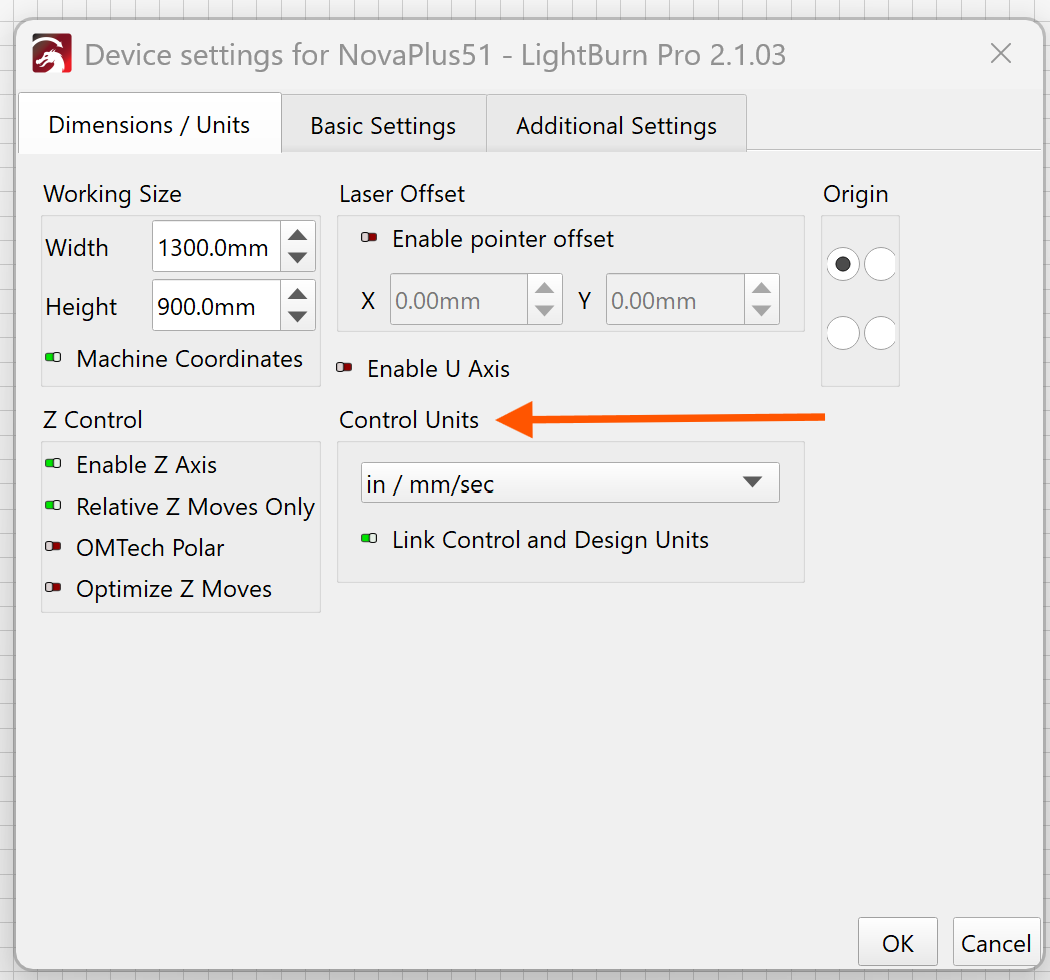 |
③ Set the Link Control and Design Units toggle to suit how you work. | 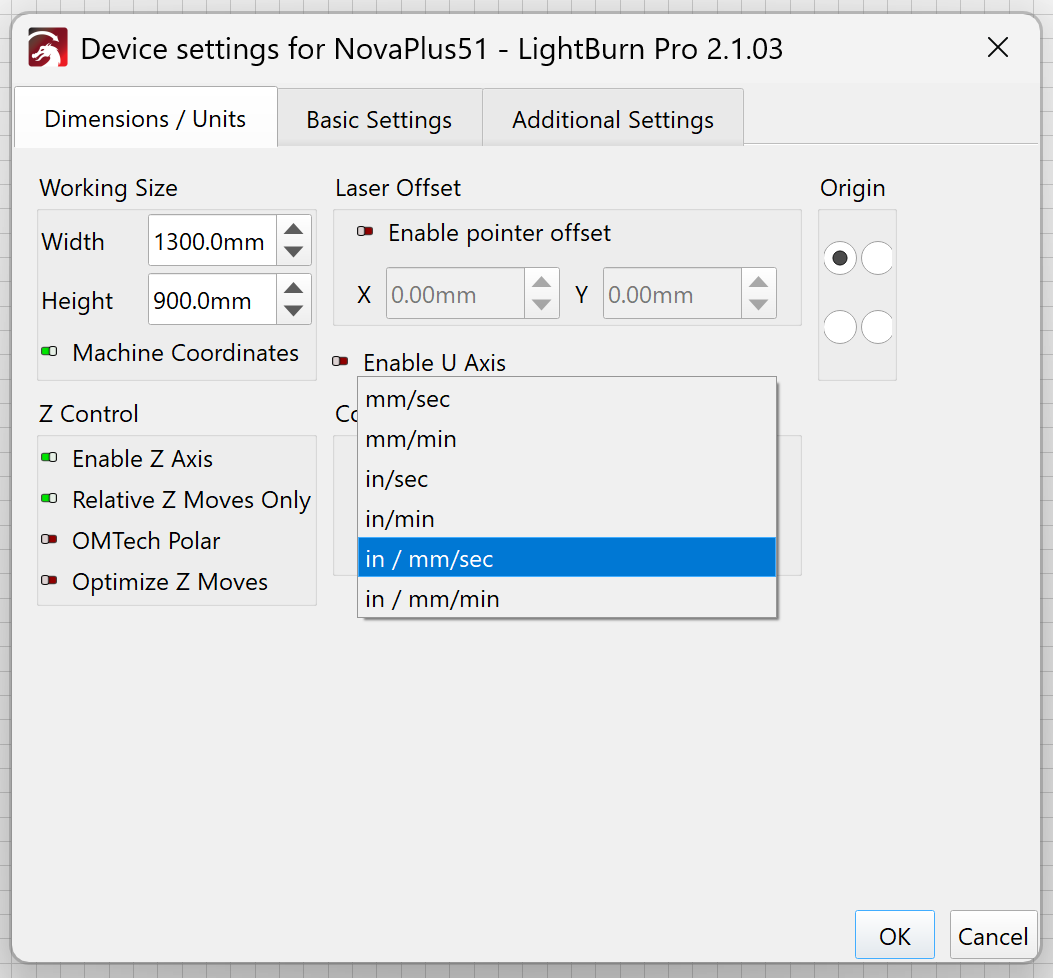 |
④ Confirm the unit label now shown next to Speed in the Cuts / Layers panel. | 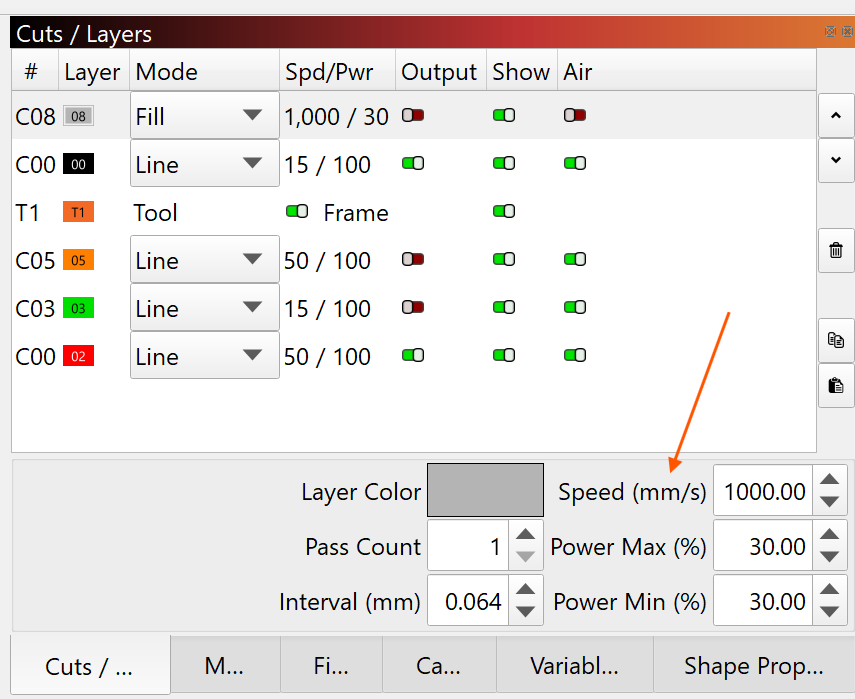 |
Known issue: LightBurn 2.1 changed unit settings for some users.
LightBurn has confirmed a gap in the version 2.1 fallback logic that reassigned Control Units without asking for users who design in inches. In the cases Thunder Laser support has handled, affected machines came in set to inches per minute (in/min). If you updated to 2.1 and your speed numbers suddenly look wrong, this is very likely the cause — your settings were not corrupted, only re-labeled. Set Control Units back to mm/sec using the steps above.
Read LightBurn's official notice here: PSA: Unit Settings Changes in LightBurn 2.1
Known issue as of 8/2026: a wrong speed unit also throws off your Scanning Offset.
LightBurn calculates the scanning offset for an engrave layer from that layer's speed and the values in your Scanning Offset Adjustment table, then writes the result into the job file. The machine does not calculate offsets — it applies exactly what the control software tells it to.
If your unit is wrong, the speed used for that lookup is wrong too. Say your offset table is built out to your machine's real maximum of 1,000 mm/s, and you type 1000 into a field that is actually set to in/s. LightBurn calculates for 25,400 mm/s — far past the end of your table — and applies an offset roughly 25.4× larger than it should be. The controller then clamps actual travel to the machine's maximum, so the head runs at a sensible speed while carrying an offset sized for a speed it can never reach.
The result is badly misaligned bidirectional scan lines. You can see it in LightBurn's Preview before you ever send the job, and it will appear in the finished engraving. If you see it, correct the speed unit — do not edit your offset table to compensate.
LaserMaker
LaserMaker's speed unit is set in Settings, where you choose the distance unit (millimeters or inches) and the time base (seconds or minutes) independently. That means all four combinations — mm/s, mm/min, in/s, and in/min — are possible. Set it to millimeters and seconds to match the machine.
RDWorks
In RDWorks, go to Config → System Settings → Interface and find Velocity Unit. RDWorks offers three choices: m/min, mm/s, and inch/s. Select mm/s.
Note that RDWorks does not offer in/min. If you are working from a setting quoted in in/min, you must convert it yourself using the ratio table above before entering it — there is no unit you can switch to that will accept it directly.
The workspace measurement unit (millimeters or inches for artwork dimensions) is a separate setting from velocity in both LaserMaker and RDWorks. Changing your drawing units to inches does not change your speed unit, and vice versa.
Where the Setting Lives | Reference Image |
|---|---|
LaserMaker — Settings, distance and time-base selectors. | 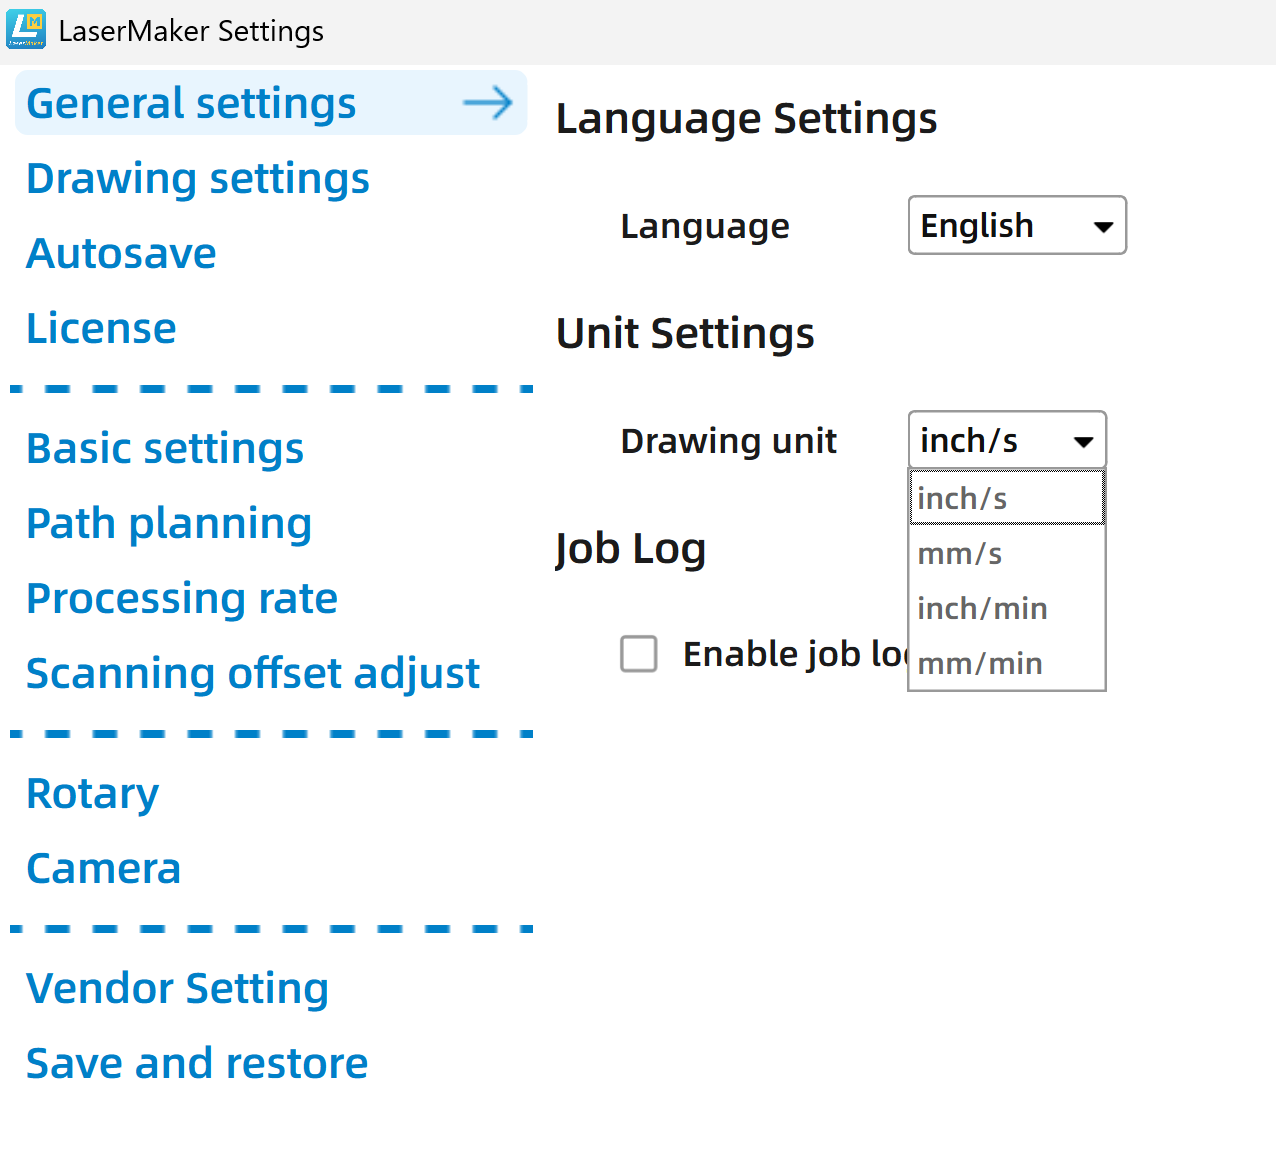 |
RDWorks — Config → System Settings → Interface, Velocity Unit dropdown. | 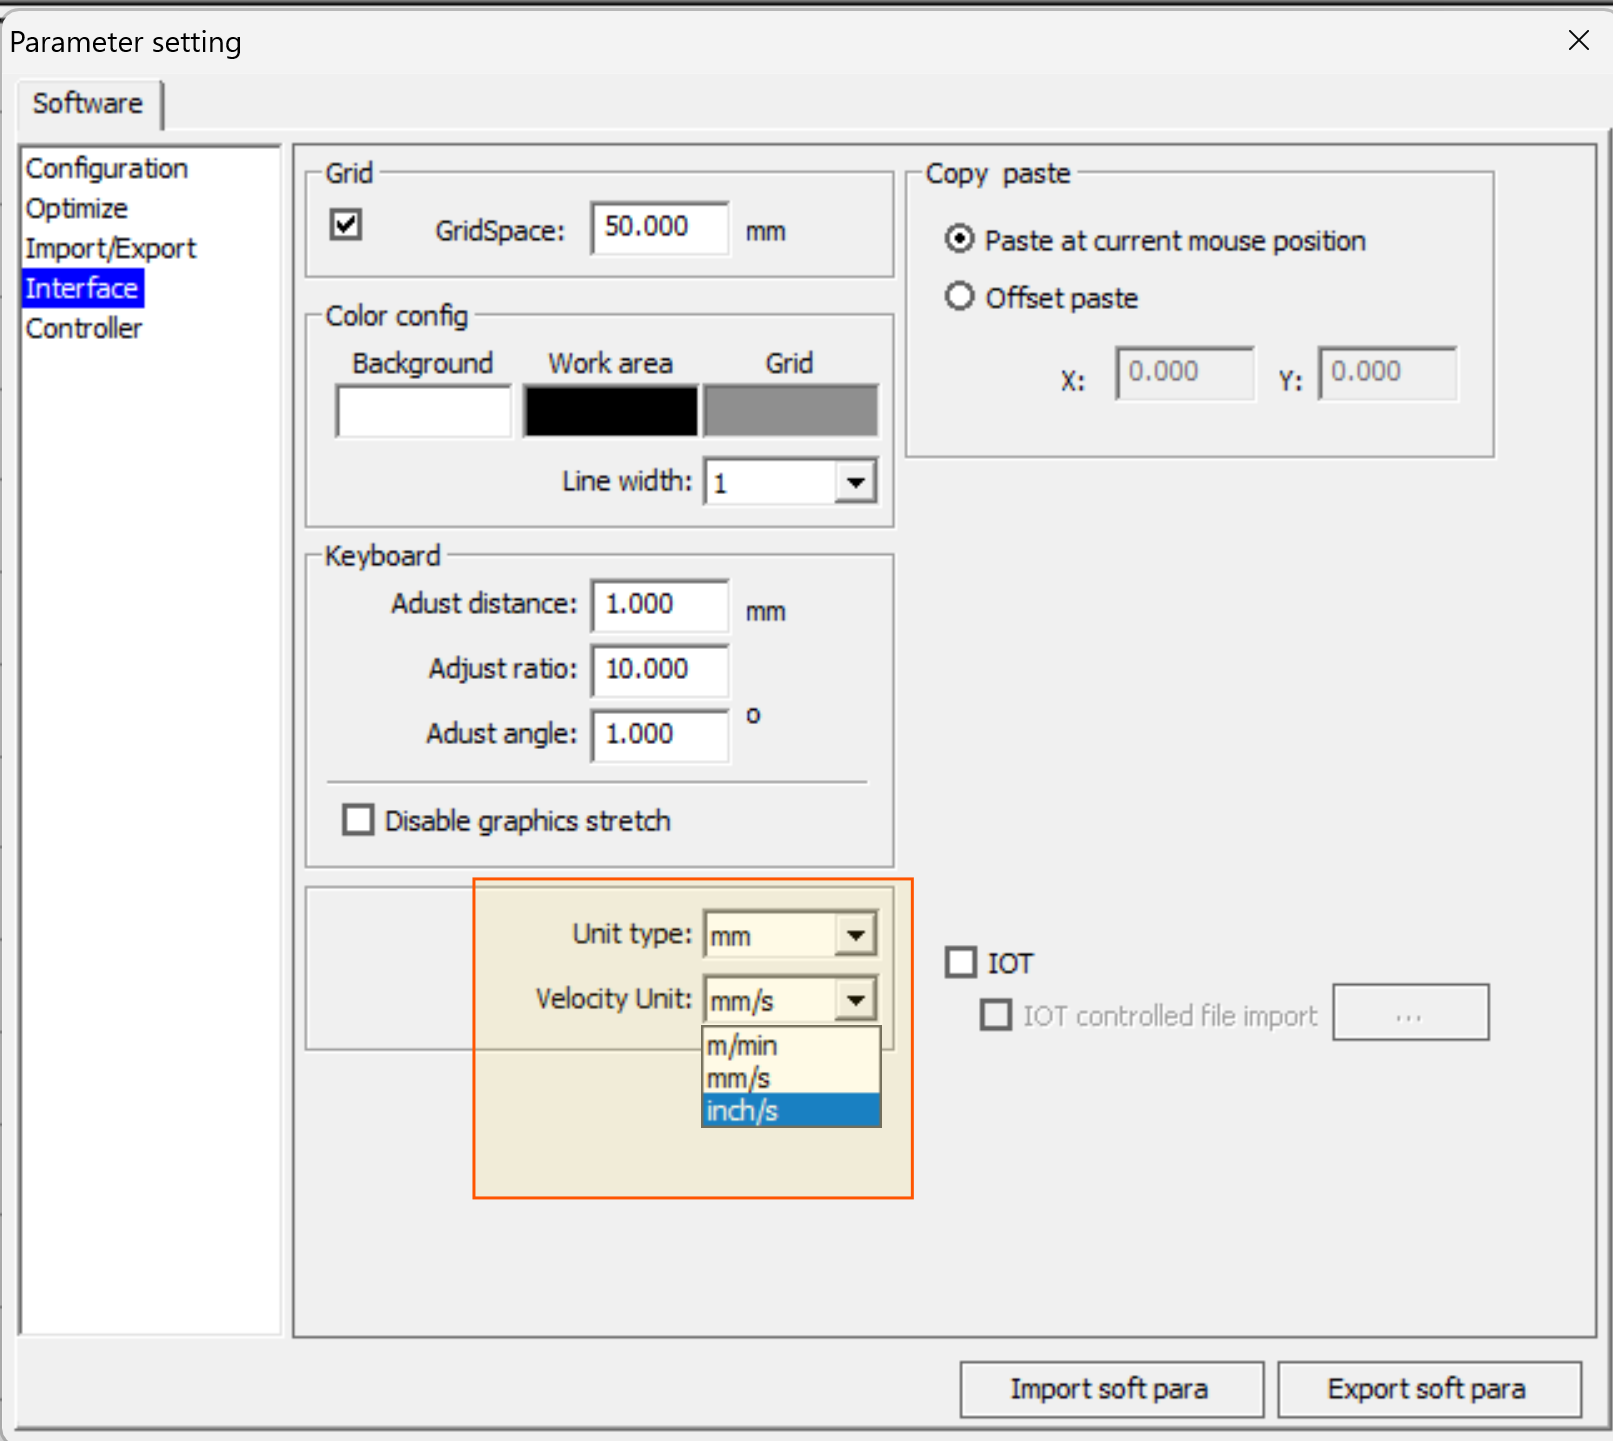 |
Layer parameters — the speed field with its unit label visible. | 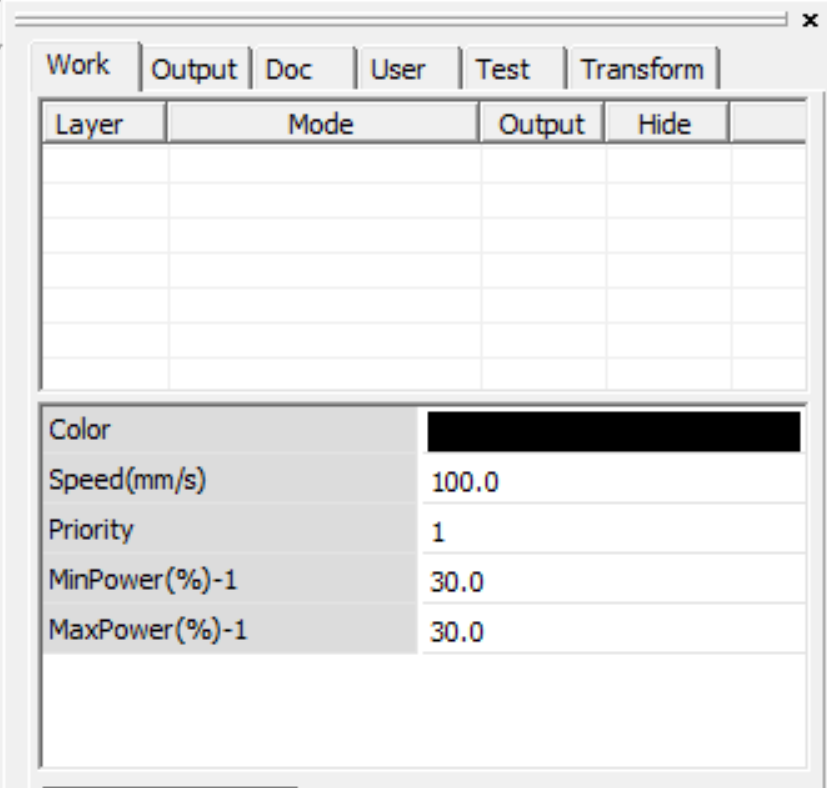 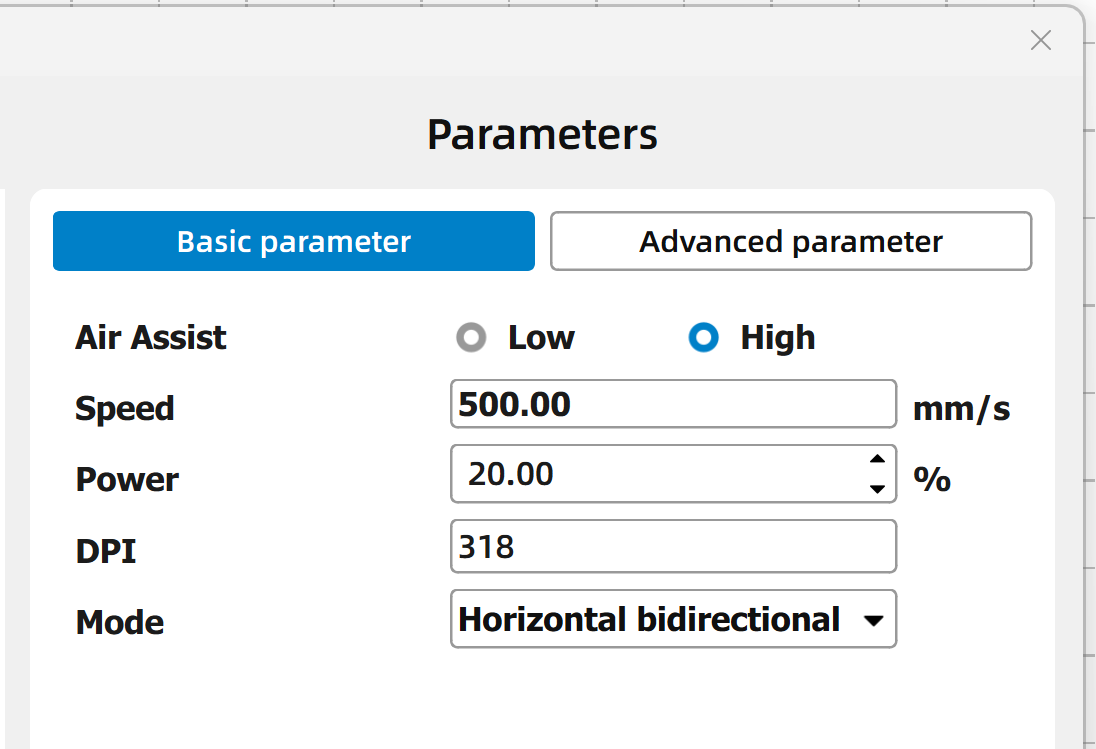 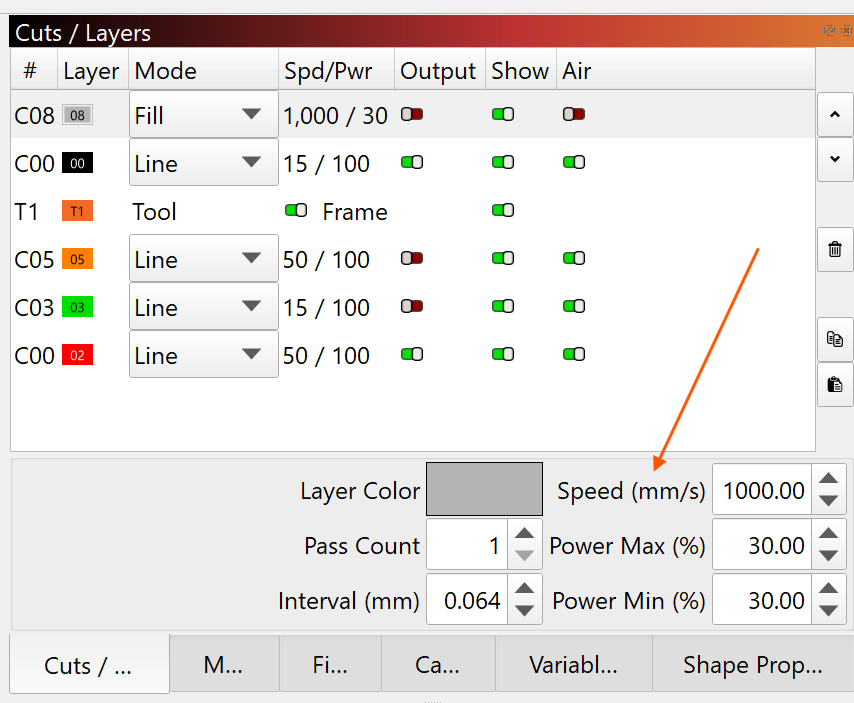 |
Machine screen — always mm/s. This is the authoritative reading of what the machine will actually do. | 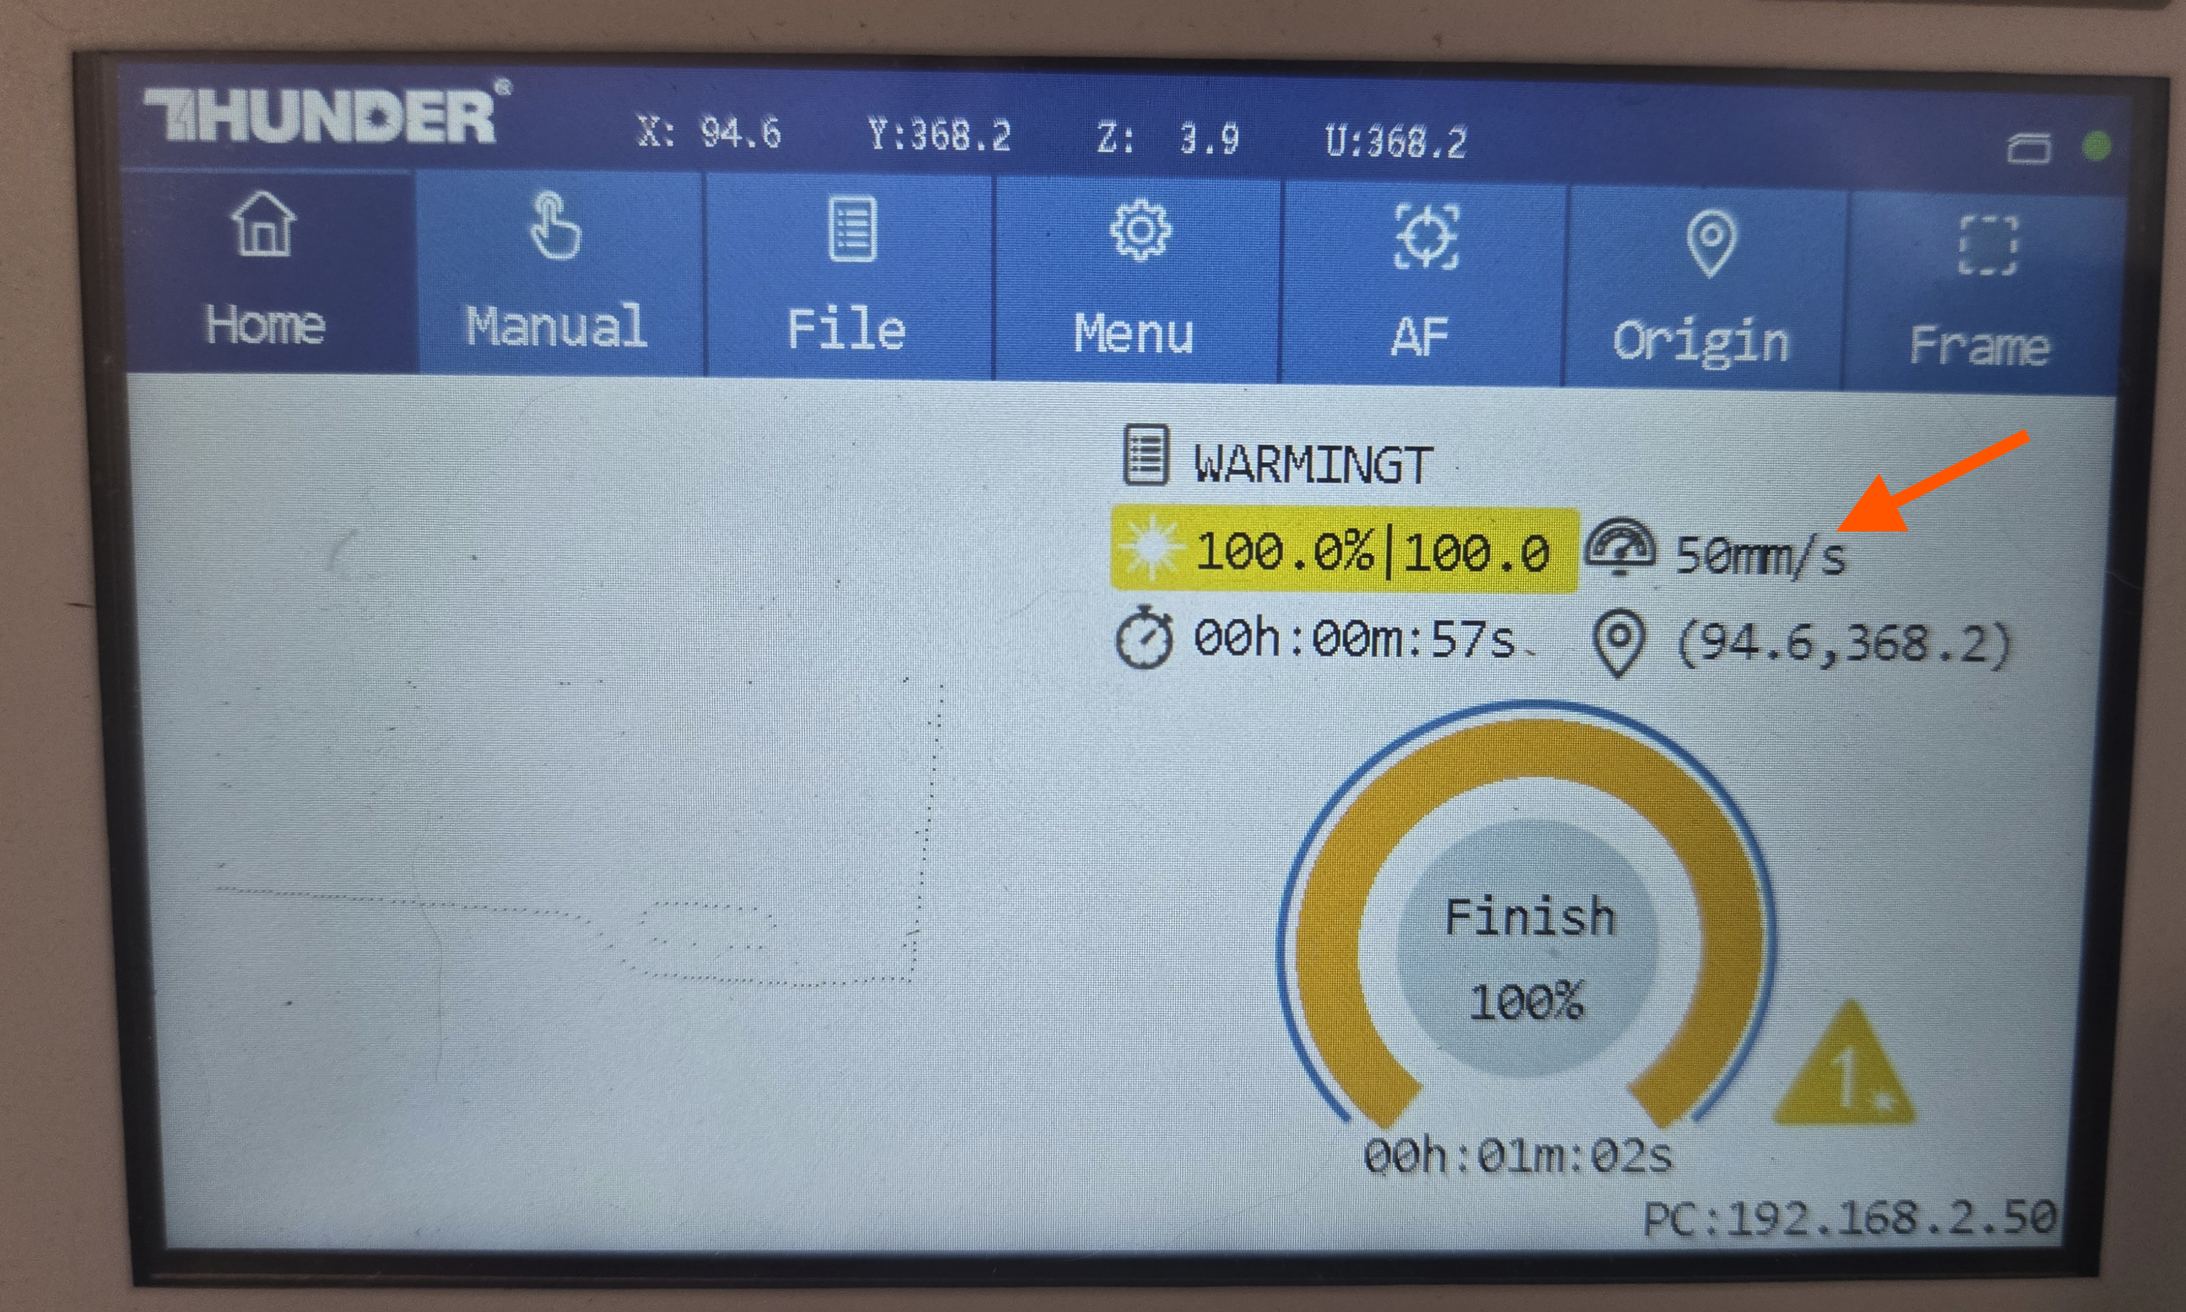 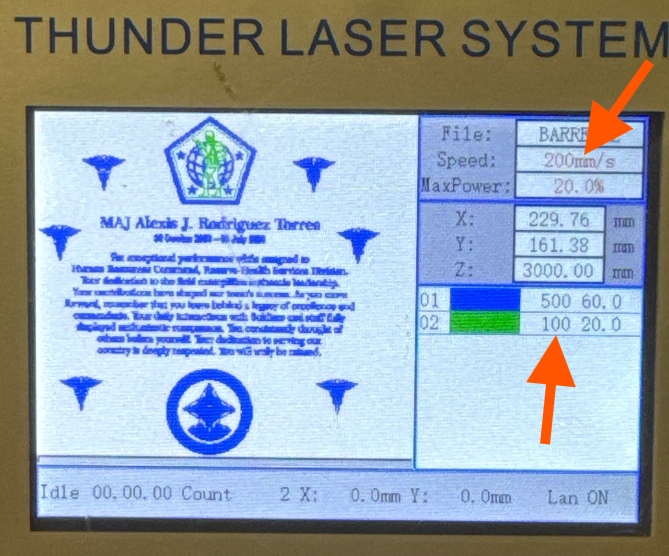 |
The Final Check: Read It on the Machine
Because the controller always works in mm/s, your machine's own display is the one place where the unit can never be ambiguous. If you are ever unsure whether a job was sent at the speed you intended:
Send the job to the machine but do not start it.
On the machine's control panel, open the file and view its layer parameters.
Compare the speed shown — which is in mm/s — against the value you expected in mm/s.
If they do not match, correct your software's unit setting rather than adjusting the number to compensate. Guessing a corrected number keeps the mismatch in place for every future job.
This takes about thirty seconds and will catch every units problem described in this article.
If you are a Thunder Laser USA client and still need Technical Support after exhausting the resources in the Knowledge Base, email [email protected] and the Technical Support Team will promptly assist you.
Still stuck?
Fastest response times in the industry from our US-based support team.