
Nova Series: Testing Z Axis Endstops and AutoFocus Eyes
Preface: This article covers the steps to check the basic functions of the Z Axis endstops on a Thunder Laser Nova Series machine
Quickstart Video
Complete Guide
Background
The Z axis is the only axis to use multiple endstops on your Thunder Laser. The Z axis uses the Auto Focus eyes as the upper endstop, which is Zlimit- in the controller. The Zlimit+ is the lower endstop towards the bottom of the machine. The naming convention may seem odd — Zlimit- is higher than Zlimit+ — but it makes more sense when you think about how Z=0mm is the upper position and the value of the Z position increases as you lower the bed further away from the Laser Head.
Purpose of Z Axis Endstops
Since the Z axis is not homed during startup (prevents crashes) it is given an arbitrary value (3000mm) at startup, but once you do an Auto Focus or manually reset the Z Axis from the Ruida DSP on the machine, the Z axis will be assigned a new value. For Nova series machines that do not use a home offset, the new value is 0. The machine will not let the Z axis travel into the negative space, so you may have to re-home if you remove materials/the honeycomb out and want to establish a higher Z=0 reference point.
The lower Z Axis limit switch prevents the honeycomb crashing down into the crumb tray, belts, or bottom of the machine. Since the machine can operate with an obscure value (Z=3000mm + travel distance if not homed/autofocused) then the soft limits (machine software setting) cannot prevent a crash, so the hard limit (endstop) is needed to prevent the crash.
The Diagnosis Screen
As part of these checks you will need to know how to navigate to the Diagnostics screen.
From the controller home page, press the MENU button then scroll down to Diagnoses+ (right side middle of options) and press Enter.

To Check Upper Z Endstop
Remember, on the diagnostics screen the Upper Endstop (Auto Focus Sensors) will show as Zlimit-.
Upper Z Endstop Check #1
Verify the Auto Focus sensors and make sure they are not pointing down too far to see each other. The mounting holes for the sensor can be too close to the edge on the radius and this causes the sensor to be out of alignment. Check both the left and right side sensors:

Upper Z Endstop Check #2
Visually inspect the lights and use your hand to break the beam. On the right hand side sensor, you should see a Red or Amber Light (depending on vintage) turn on when you block the sensor's path to the left side sensor and go off when you remove your hand. This check will tell us if the sensor is functioning even before we check if the signal is making it to the Ruida DSP controller. If the eyes are functioning, go to Check #3.
| LED OFF (Not Blocked) Older Style Eye | LED ON (Blocked or not seeing left side) Older Style Eye |
|---|---|
 |
 |
| LED OFF (Not Blocked) Newer Style Eye | LED ON (Blocked or not seeing left side) Newer Style Eye |
 |
 |
Upper Z Endstop Check #3
Verify the signal is making it to the controller. You can use the diagnostic screen on the controller or the Red LEDs on the physical controller. The LED will light up when the sensor is blocked. If the LED on the Auto Focus sensor comes on but LED5 for Zlimit- does not light up, then there is a wiring or output issue from the Auto Focus Sensor (endstop) to the controller.
| Zlimit- Triggered on Diagnostic Screen (Blocked or not seeing left side sensor) | ZLimit- LED5 Illuminated on Ruida Controller (Blocked or not seeing left side sensor) |
|---|---|
 |
 |
To Check Lower Z Endstop
Since the lower endstop is a mechanical switch and there is only one of them and it does not have LED lights, it will be easier to check since the signal can only be checked visually for damage and then at the Diagnostic Screen or from the LED lights on the Ruida Controller.
Remember, on the diagnostics screen the Lower Endstop (Mechanical Sensor) will show as Zlimit+.
Lower Z Endstop Check #1
Visually inspect for damage to the arm. Make sure the arm is not bent out of shape and that the "Clicking" function still works. A gentle press of the arm is all you need to make it click.

Lower Z Endstop Check #2
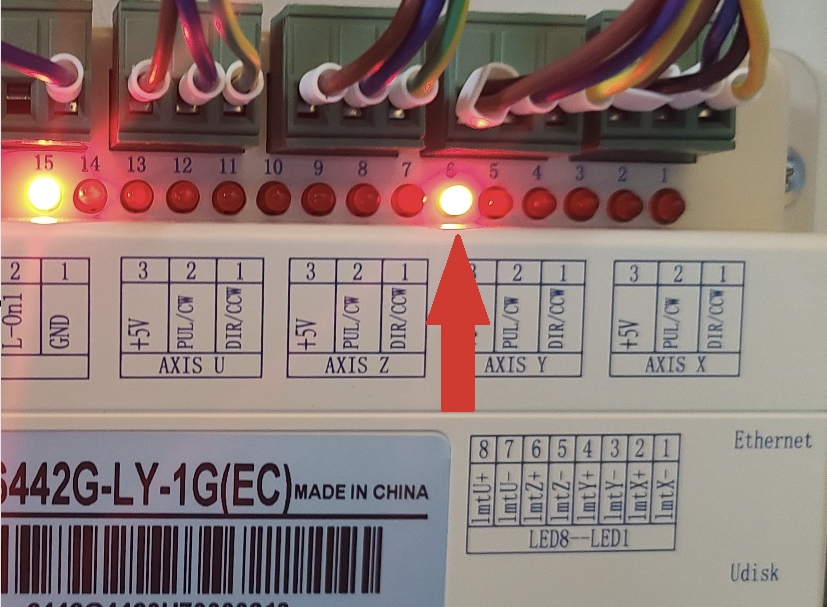
Verify the signal is making it to the controller. You can use the diagnostic screen on the controller or the Red LEDs on the physical controller. The LED will light up when the sensor is blocked. If the LED on the Auto Focus sensor comes on but LED5 for Zlimit- does not light up, then there is a wiring or output issue from the Auto Focus Sensor (endstop) to the controller.
| Zlimit+ Triggered, arm is depressed on Diagnostic Screen | Zlimit+ is triggered - LED6 Illuminated on Ruida Controller |
|---|---|
 |
 |
Reference Articles
- What do the Red LED Lights on the Ruida Controller Mean for Nova and Odin Lasers
- Z Axis Honeycomb Bed will not Raise or GO UP or only Goes Down until it reached the bottom
Where to get Replacements
Still stuck?
Fastest response times in the industry from our US-based support team.