
Introduction
So you just bought a new Thunder Laser? This guide will help get you up and running.
Safety
For safety information, please see the Owner's Manual.
Before Your Machine Arrives
Prepare Your Space
The following topics will help you decide where to locate your machine and to see if you have adequate space for it.
Machine Sizing and Clearance
The article below will give you precise dimensions and example layouts for space considerations:
Nova Series Machine Dimensions
Fitting Through a Door
All Nova Series machines can fit through a standard doorway. Please see this article if you plan to move the machine through a door:
Getting Nova Series Machines Through A Standard 30" Doorway
Exhaust Routing Plan
All Nova Series machines come with an exhaust fan and ducting to ventilate outside. More information can be found here:
Venting The Exhaust From Your Thunder Laser
Electrical Install Plan
Be very explicit with your electrician. The service is for 120v 20amp. USA Thunder Lasers do not operate and will be damaged by 220v.
The chiller, exhaust fan, and stock air pump all plug into the back of the Nova series machines. Please do not use an extension cord. If this is unavoidable, please see this article:
Using Extension Cords With Thunder Laser Nova Series
More information can be found about the Electrical requirements for your machine here:
Thunder Laser Main Power Requirements
Nova 24 Stand Options
The Nova 24 is a desktop machine so it will require a table or stand. More information can be found here:
Prepare Your Computer
The following topics will discuss setting up your computer for basic communication to your machine.
Computer Requirements
LightBurn will run on Windows 7.0 or later (32 or 64 bit), MacOS 10.11 or later, or 64 bit Linux. LightBurn does not require a powerful computer for most work, though if your designs contain a lot of images, more memory is helpful. As with most things, a faster computer will make it easier to work with large images or complex vector graphics.
Choose USB or Ethernet Connection
Ethernet is recommended if available, even if through a USB to Ethernet converter. USB will work fine for both Mac (updated FTDI drivers) and Windows. Ethernet also works better when you have multiple machines with the same controllers. USB is limited in cable length, so you may need an extension that will further weaken the signal.
Down below are the instructions for setting up the USB or Ethernet connections.
Install LightBurn Trial
You get 30 days to use LightBurn for free. You can install LightBurn and then create a mock device for your future machine. This will allow you to explore LightBurn and its features in preparation for your machine.
Download LightBurn here:
LightBurn Trial Information
Setup mock machine:
LightBurn Trial Mock Nova Setup
Install FTDI Driver for Windows USB
You must follow this if you are connecting to your laser via USB:
Connecting to LightBurn via USB
Update FTDI Driver for Mac USB
For Macs, if you plan to stick with USB, you will be required to update your FTDI driver or else you may run into incomplete file transfer and communication issues. More information can be found here:
New FTDI Driver Solves Mac USB Issues
Ethernet Setup for Mac and Windows
If you decide to use Ethernet, you will need to follow the guides here. Each user's ethernet configuration can be different based on your network setup. More information can be found here:
Connecting to LightBurn via Ethernet
Preparing Yourself
Buying a large format, industrial quality Laser machine can be overwhelming and intimidating. We do our best to provide the best resources to prepare you for what's to come. Following our guide will set you up for success and easy your worries. Whether you are transitioning from a non Thunder or brand new to lasers we have the tools to make you a proficient user and know your machine inside and out.
Find a YouTube Channel or two or three
Some examples:
- Robert Kofoed: Computer CreationZ
- House of Lasers
- Jay Malone: Malone Custom Designs
- Simply Sallie
- The Awesome Orange
- 85th and Pine
- I Like To Make Stuff
- Laser Engraving with Matt
Order Materials to Have on Hand
Decide on a some simple things to start with, especially if this is your first dip of your toe into the Laser World. Purchase some cheap wood/mdf from your local store, maybe some cheap glasses from the dollar store. Knowing that you will need to practice and waste a bit ahead of time will make it easier when you are tossing some of these items.
Prepare for Delivery Logistics
Receiving a larger machine is not as easy as a Amazon Box being left by your garage door. One of the most stressful things can be the delivery process.
Before you even schedule a delivery day with the Depot, review your own setup.
- Do you have a steep driveway? Concrete path or rock/dirt?
- Is your driveway navigable by a box truck?
- If you are receiving a larger machine, can you even move it with what you have? Deliveries are "Curb Side" and the depot won't hesitate to re-iterate that. A driver that is willing to help you push it up your driveway is a great help but not guaranteed.
- Will you have room to un-crate and unload the machine off the crate base?
- Do you need to schedule a Forklift or Flatbed? Pallet jack?
- Do you have a loading dock?
- Are there any large steps, thresholds etc to navigate over?
Once you receive your tracking, follow it closely on the courier's website. Most of the time the delivery date is the day it will arrive at the depot. Be proactive, call the depot ahead of time and work with them to schedule a delivery. Depending on your location, they may only come out that way 1 day a week, so if you miss your chance, it could be a whole week delay. Ask them about how the crate will be loaded, the use of the lift gate etc. They often will offer a 1hr call ahead but that is not guaranteed either, each driver will handle that and some are way better than others.
More information can be found here:
Shipping & Delivery
Spare Parts Considerations
If your machine uptime is critical to your business, spare parts are recommended even when under the warranty period. Shipping logistics have not been consistent for 2 years and nothing is fast or guaranteed. For warranty parts, the goal is to ship USPS priority but larger items may ship via UPS Ground. Expedited shipping is not included in the warranty.
More information can be found here:
Critical Spare Part Recommendations for NOVA series machines
Review the Usual Suspects
Tackling the Usual Suspects will help you on your Laser journey. Often times new users get hit with offset issues, extend space issues etc that are all covered in the Usual Suspects article below.
The Usual Suspects and Preparing For Your 1 Hr. Training
Familiarize Yourself with Laser Terms
Review LightBurn Help Videos and Tutorials
LightBurn Tutorials and Help Videos
Review the Owner's Manual
Watch an Example 1Hr Training
Typical 1 Hour Training Sessions
Order Supplies Needed for Setup
You will need to provide 2 gallons of Distilled water and a method to connect the exhaust hose to the final connection point (Clamp and fittings). You should also get 2 gallons of Distilled water every 4 months to change out the chiller water. More on that under the Preventative Maintenance topic below.
LightBurn License Management
More information on the LightBurn License can be found here: LightBurn License Management
Things To Do Once the Machine Arrives
Ok, so now the machine is here and it is GO TIME. Hopefully your thorough review of the above topics has helped you feel comfortable for what comes next.
Setup of the Machine
Un-crate the Machine
More information can be found here:
Explore the Laser Machine Layout and Components
Familiarize yourself with:
- Controller Screen Functions
- Air Assist Controls
- Laser Head Assembly
- Mirror Locations and Function
- Auto Focus Sensors
- Honeycomb, Knives, and Crumbtray(s)
- Stack Light
- Pass Thru Front and Rear Doors
More information on Component Descriptions can be found here:
Nova Series Laser Machine Components and Descriptions
Set Up Your Laser Machine
Time to set the machine in place, level it, install the Chiller, Air Pump and Fan as well as run the exhaust and fill the chiller. After that...time to power up.
(Note that your fan and chiller may look different, same setup still applies)
More information can be found here:
How to setup your Nova laser cutter 2020 Video
Familiarize Yourself with the Toolbox Contents
What is in the box: Nova Series Included Parts
Power Up the Machine
PLEASE DOUBLE OR TRIPLE CHECK THAT YOUR RECEPTACLE IS NOT 220v. If you power the machine with 220v, it will fry the 36V motor driver power supply, the main contactor and LPSU and it is not covered under warranty.
Now that the machine is set up and ready to run, it is time to power up the machine and do some pre-use checks.
Things to note about powering up the machine:
- Main switch provides power to lights, controller and motor
- Laser switch provides power to the Chiller socket and the Laser Power Supply
- Chiller has its own power switch, you should turn it on and leave it on. Let the Laser power switch mentioned above control the chiller
- The chiller will beep upon power up, that is normal. That is the initial flow alarm while the pump is starting to get the water moving
- The BIG red E-stop button. It takes a solid twist in the direction of the arrows to reset the E-stop button. Even when activated, there is some slight spring action
Upon the first start, the chiller will fill the tube with water. Be sure to re-check and adjust the water level.
Should your machine not power up, please refer to this guide:
Nova Series Laser Won't Turn On - No Power
Perform Pre-Use Tasks (Air bubbles, air assist, clean mirrors, pulse check)
Air Bubbles in Tube
Check for Air bubbles in the Laser Tube. After you fill the chiller and then power up the machine (both the Main and Laser Switch) and the Chiller Main Power switch, you will need to inspect the laser tube for air bubbles and take steps to remove them. Small bubbles can be removed by pinching the tubes and a large air bubble on the left side of the tube (nearest the stack light) indicates the Chiller Tubes are reversed.
Clean Your Optics
You should clean your optics prior to test firing your machine for the first time. Here is an article on how to do so. Click the following link(s):
Inspecting and Cleaning Nova Series Optics
This is what can happen if you don't frequently check your optics. Click the following link(s):
Common Focus Lens Failure & ZnSe Info
Check Your Air Assist
The green buttons on the left side of the machine allow you to test the high and low air assist. You can press each button and adjust each flow valve knob (below button) to make sure air is flowing out of the laser nozzle.
Pulse Check
With the chiller on, all doors closed and machine fully set up and checked out it is now time to do a pulse check. Place a piece of material under the nozzle and focus the laser head to 6mm above the material. Close all the doors and momentarily press the pulse button on the Laser Control Screen to generate a pulse. Look for a pulse burn mark.
Complete the Setup of LightBurn
If you had created a mock setup from the above steps, you can use that setup or modify it as needed to finish the setup of LightBurn to get your machine connected. It is recommended to only have 1 device profile per machine so that you are not having to make sure you select the right one each time.
Check for Latest Version of LightBurn and Bug Fixes
In LightBurn: Help > Check For Updates

LightBurn Bug Fixes
LightBurn Releases
Check for Trial License Remaining (enter full license from Email)
In LightBurn: Help > License Management
LightBurn Trial Status
LightBurn License Management Portal
Check That LightBurn is Communicating With Your Laser
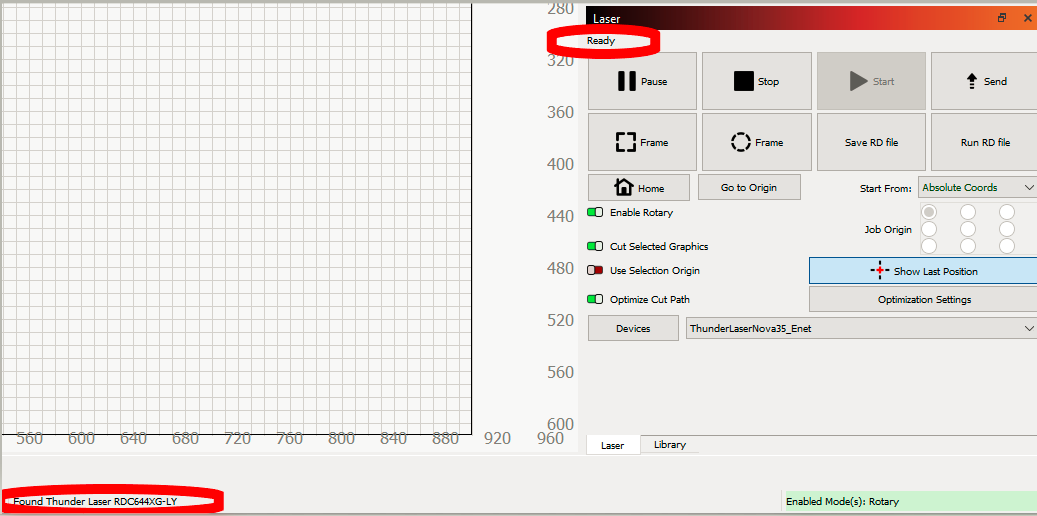
If you cannot get LightBurn to say Ready instead of disconnected and to find your Ruida Controller, you will need to double check your USB or Ethernet Setup. You can also try to right click on the "Devices" button in the LightBurn Laser Window to make LightBurn look for your machine. Also if you have created multiple Devices, make sure you have the right one selected in the drop down selection next to the Devices button.
Not Connected:

Connected:
Backup Machine Settings To Computer
Once LightBurn is communicating with the laser you can backup the machine settings.
In LightBurn: Edit > Machine Settings
Let it read the machine settings and then save them to your 'Thunder LightBurn' folder of choice.

Upload Parameters from Laser Machine to LightBurn for Time Estimate
Once LightBurn is communicating with the laser you can perform this step.
This is to help you get better time estimates so you can quote your jobs and manage your workflows better.
More information can be found here:
Improving Job Time Estimates In LightBurn's Preview
Enter Scanning Offsets from Gold Card
Do this before attempting to do any Fill layer engraves and make sure LightBurn is in MM when entering these values. Otherwise you will get double prints. And be sure to Enable the offsets by clicking the slider to Green.
More information can be found here:
Thunder Laser Scanning Offset Adjustment
Once you enter the offsets, Export them and save them to your "Thunder LightBurn" folder of choice.

Install Materials Library (Optional)
The Library provides a ballpark of settings for common materials. It is not all inclusive and provides good starting points that you will have to adjust based off your exact materials.
More information can be found here:
Uploading the LightBurn Materials Library

Your First Cut
Review Usual Suspects Again
Many users get stumped by things that are listed in the usual suspects so it is good to review them again.
The Usual Suspects and Preparing For Your 1 Hr. Training
Schedule Your Free 1-Hr Training
You can schedule your training prior to operating the laser if you would like. We can walk you through a small cut job like a keychain or similar.
Scheduling Remote Training & Prescribed Support Sessions
Understanding Your Workflow to Run a Job
An example of a simplified workflow:
- Picking your art work Vector vs Image and Design in LightBurn
- Setting up your Layer Types, Speeds and Powers
- Preview the artwork in LightBurn
- Set up origin in LightBurn. Absolute, User or Current Position
- Send Job to the laser
- Aligning your material
- Setting your origin at Machine based on LightBurn Origin Setup
- Focus... Auto/Manual
- Let's get the party started - Pressing the start button
Material Test File Samples
These files are a great way to find the settings for your specific materials. Run the file as is and check the results.
What To Learn and Do After You Can Run the Machine Efficiently
After you have a decent handle on how to run the machine and feel comfortable with your workflow, you can begin to add in complexity and peripherals.
Install Peripherals like ThunderCam
- ThunderCAM Installation Manual
- ThunderCam Focusing the Image and Proper Setup
- Simplified ThunderCAM Calibration & Alignment Procedure
Learn How to Use the Rotary
- RotoBoss Roller Rotary Setup
- How The Chuck Rotary Works
- Powder Coated Tumbler Workflow
- Rotary Roller Diameter Calculation
- Circle Projection on Tumbler
Learn Advanced Topics (Lead In/Out, Pass Thru)
Passthrough Print and Cut
The hardest part about print and cut is file set up. You must adjust your article to cut in as multiple jobs with common points for alignment.
Preventative Maintenance
Performing preventative maintenance will keep your machine running at peak performance:
- Preventative Maintenance Checklist
- Recommended Testing & Maintenance Equipment
- S&W CW-5000 Series Chiller Maintenance Manual
Additional Resources
ThunderLaserUSA YouTube
Thunder KB
Thunder Laser USA Technical Support
Facebook Group
Thunder Laser Global Facebook Group
LightBurn Forum
Bi-Weekly Thunder Webinar
Join us every other Thursday for a Webinar, it's free and fun.
Thunder Laser USA Bi-Weekly Tech Webinar
Still stuck?
No bots, no runaround. Talk to a U.S.-based laser tech who knows your Nova inside out.